Tag Archives: aeroponic

The 3-Legged Stool of Successful Grow Operations: Climate, Cultivation & Genetics – Part 4

By Phil Gibson
No Comments

This is Part 4 in The 3-Legged Stool of Successful Grow Operations series. Click here to see Part 1, here to see Part 2, and here to see Part 3. Stay tuned for Part 5, coming next week.

Integrated Pest Management (IPM)

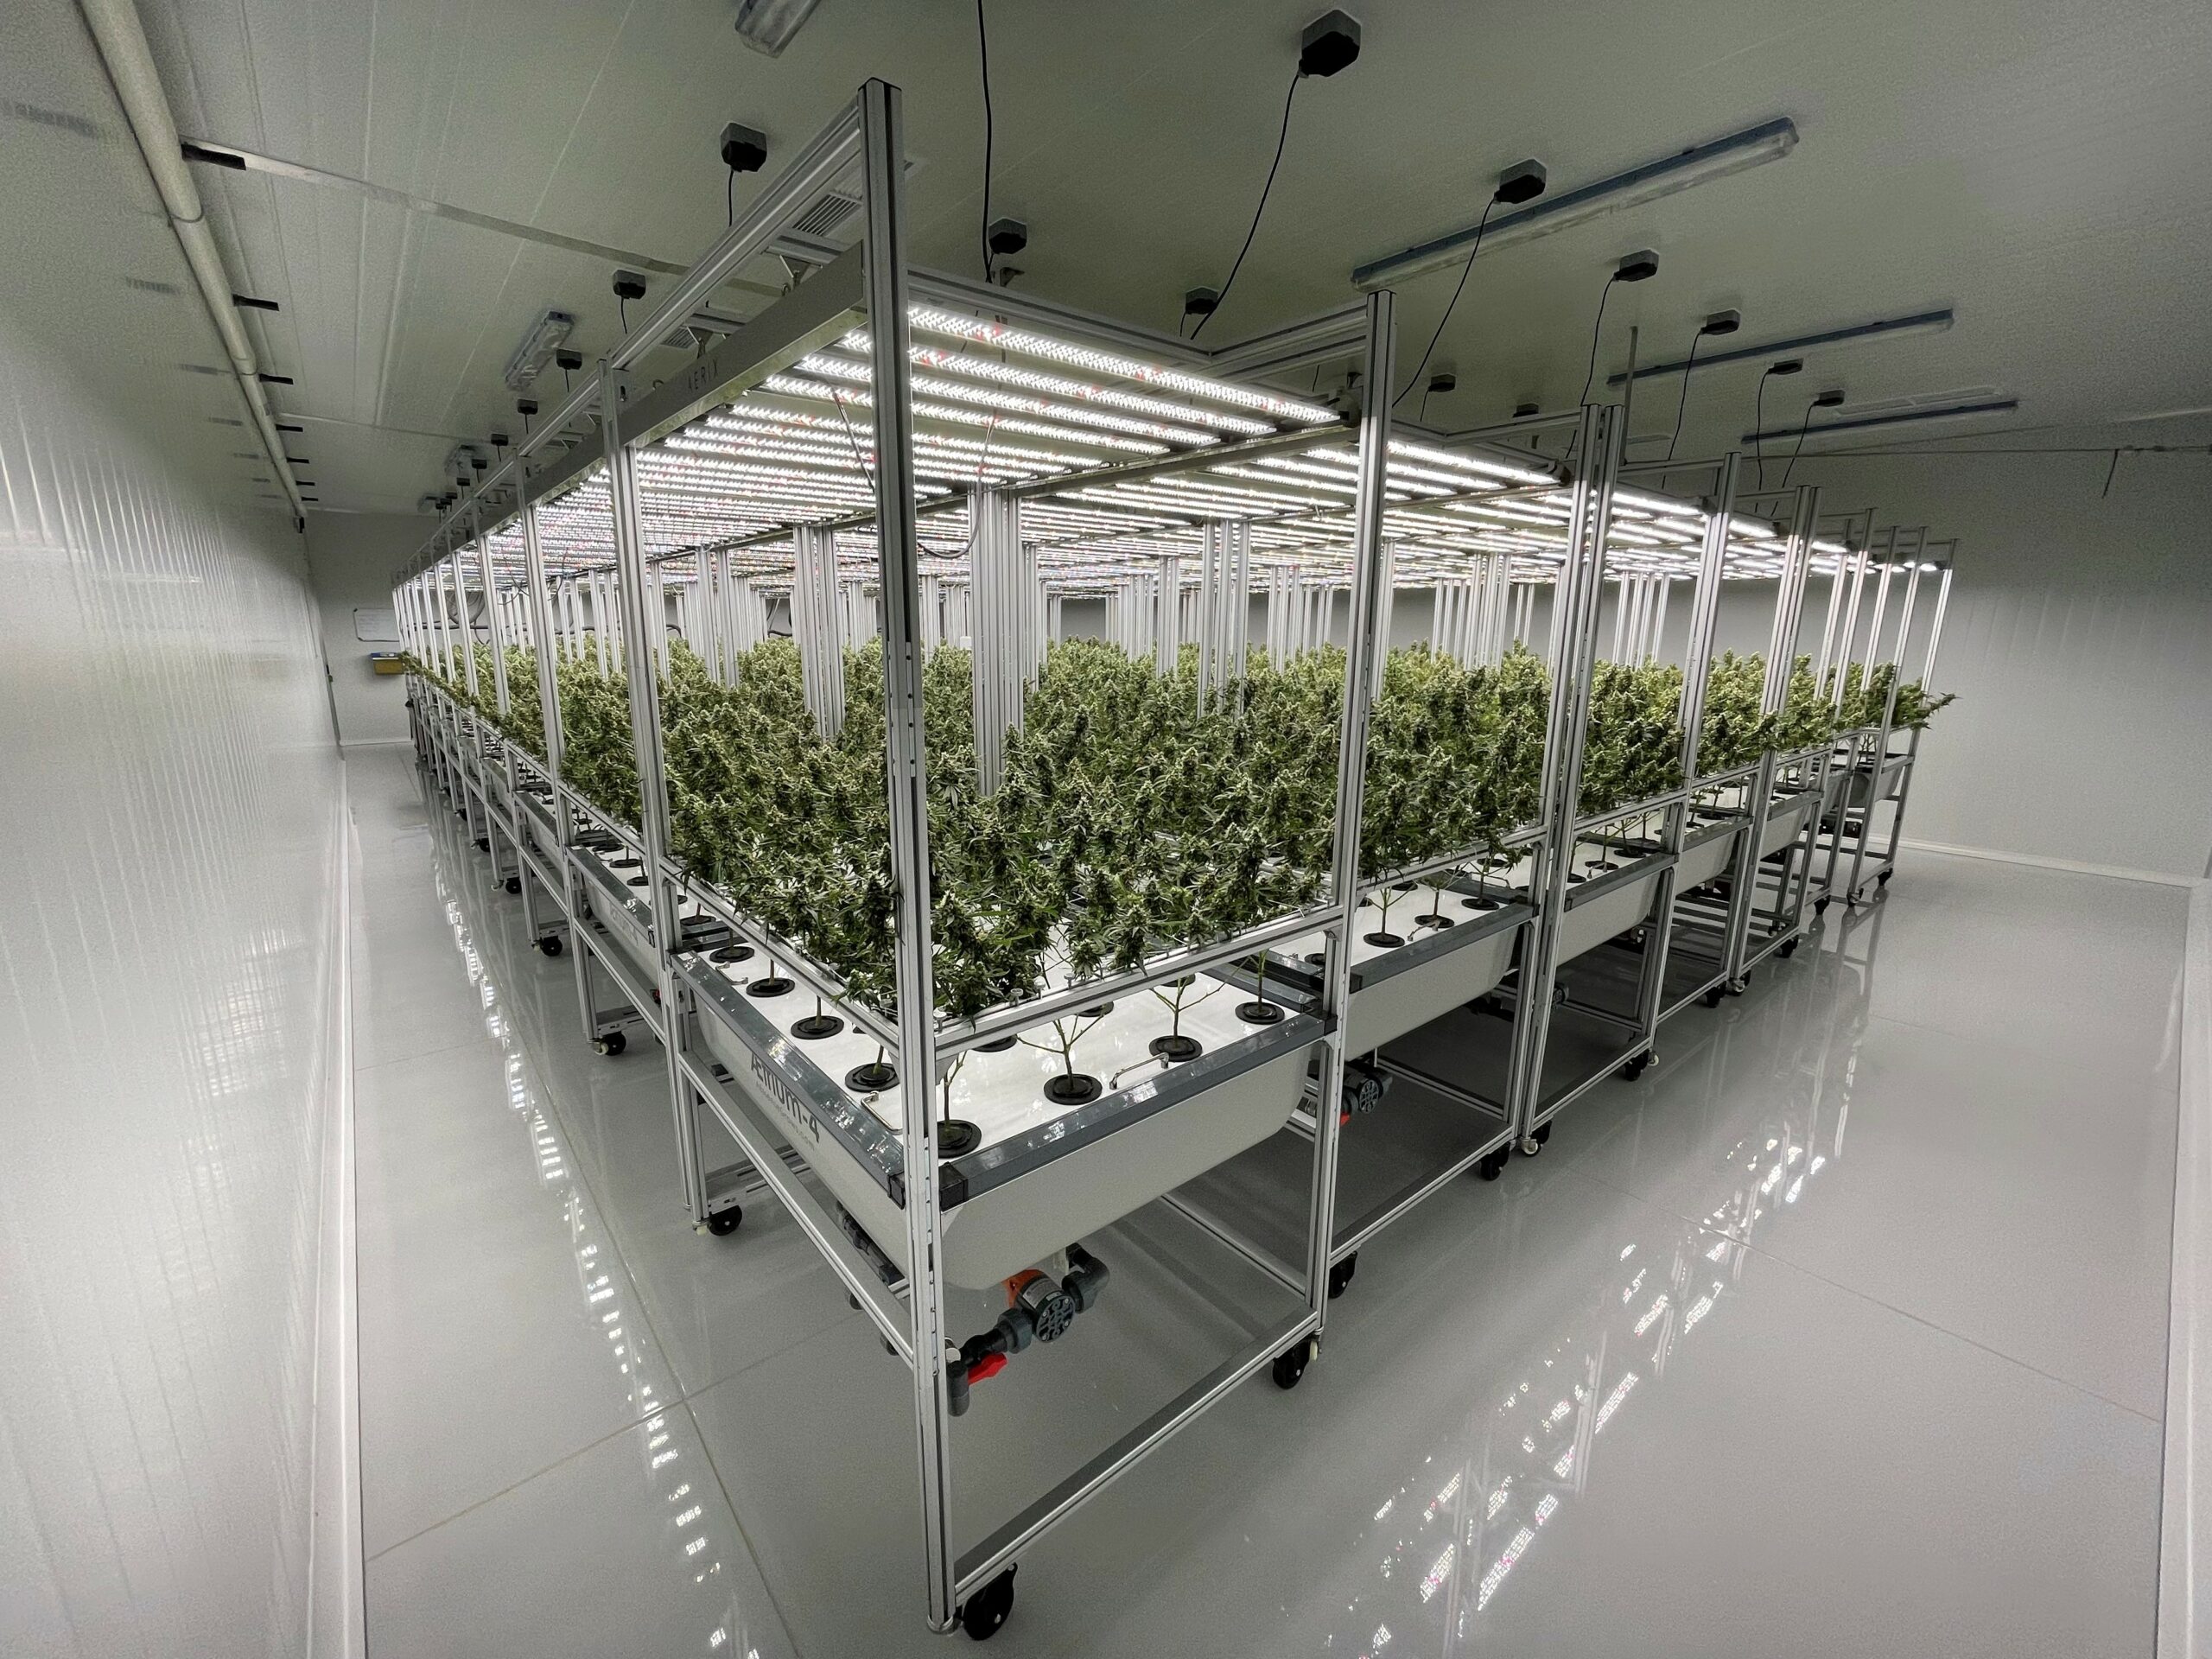
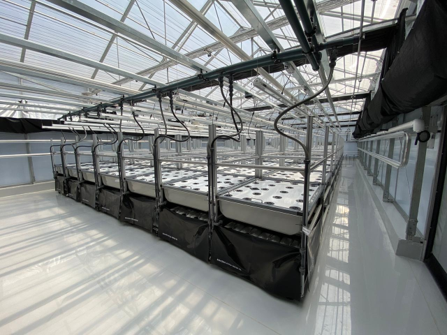
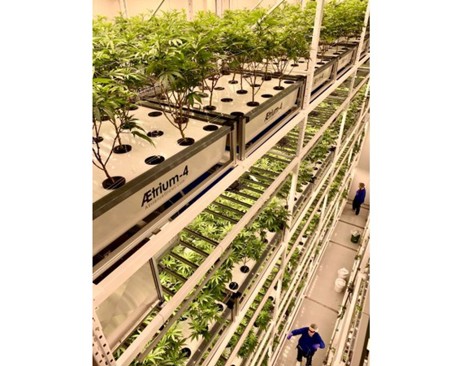
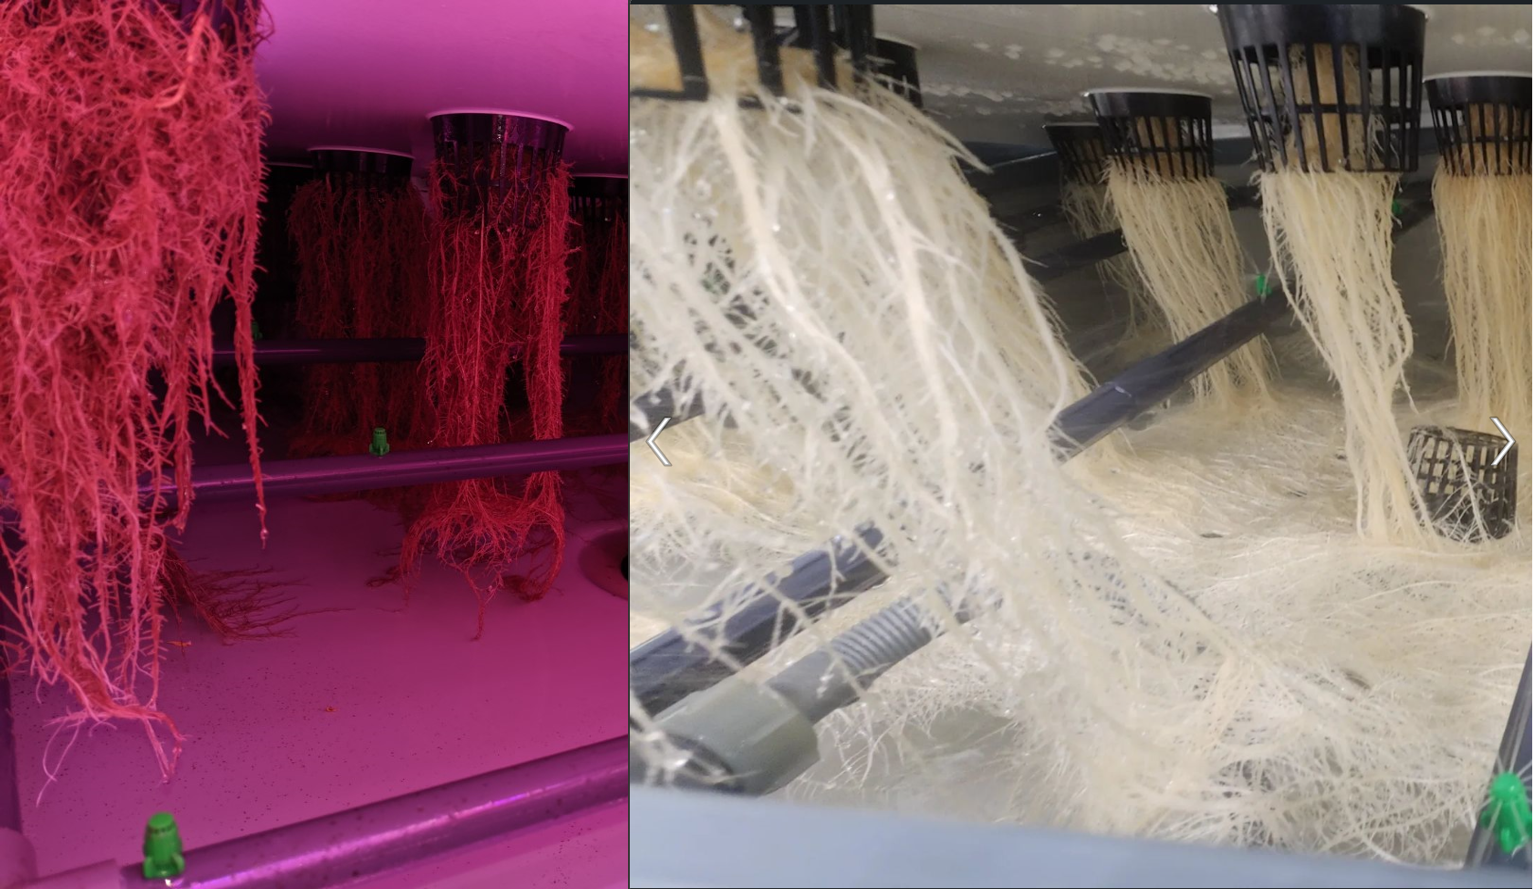
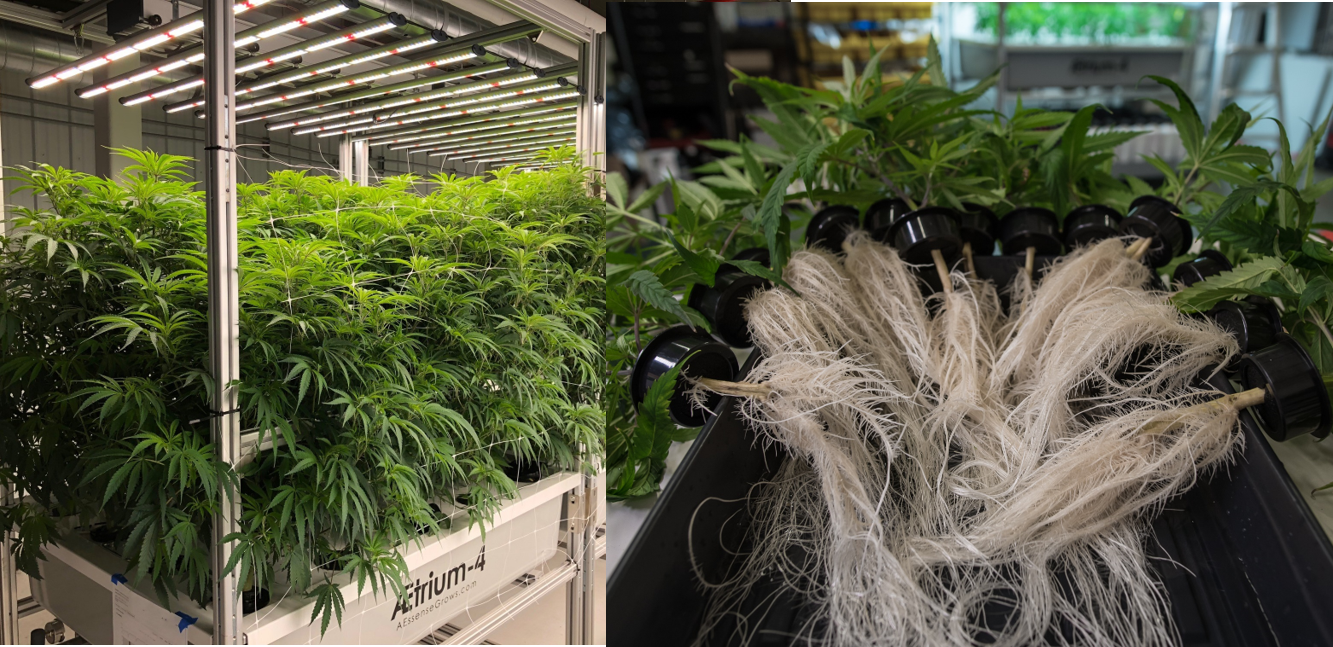
Aeroponic & hydroponic systems can operate with little to no soil or media. This eliminates the pest vectors that coco-coir, peat moss/perlite and organic media can harbor as part of their healthy biome approach. Liquid nutrient systems come at the nutrient approach from a different direction. Pure nutrient salts (nitrogen, potassium, magnesium and trace metals) are provided to the plant roots in a liquid carrier form. This sounds ideal for integrated pest management programs, but cultivators have to be aware of water and airborne pathogens that can disrupt operations. I will summarize some aspects to consider in today’s summary.

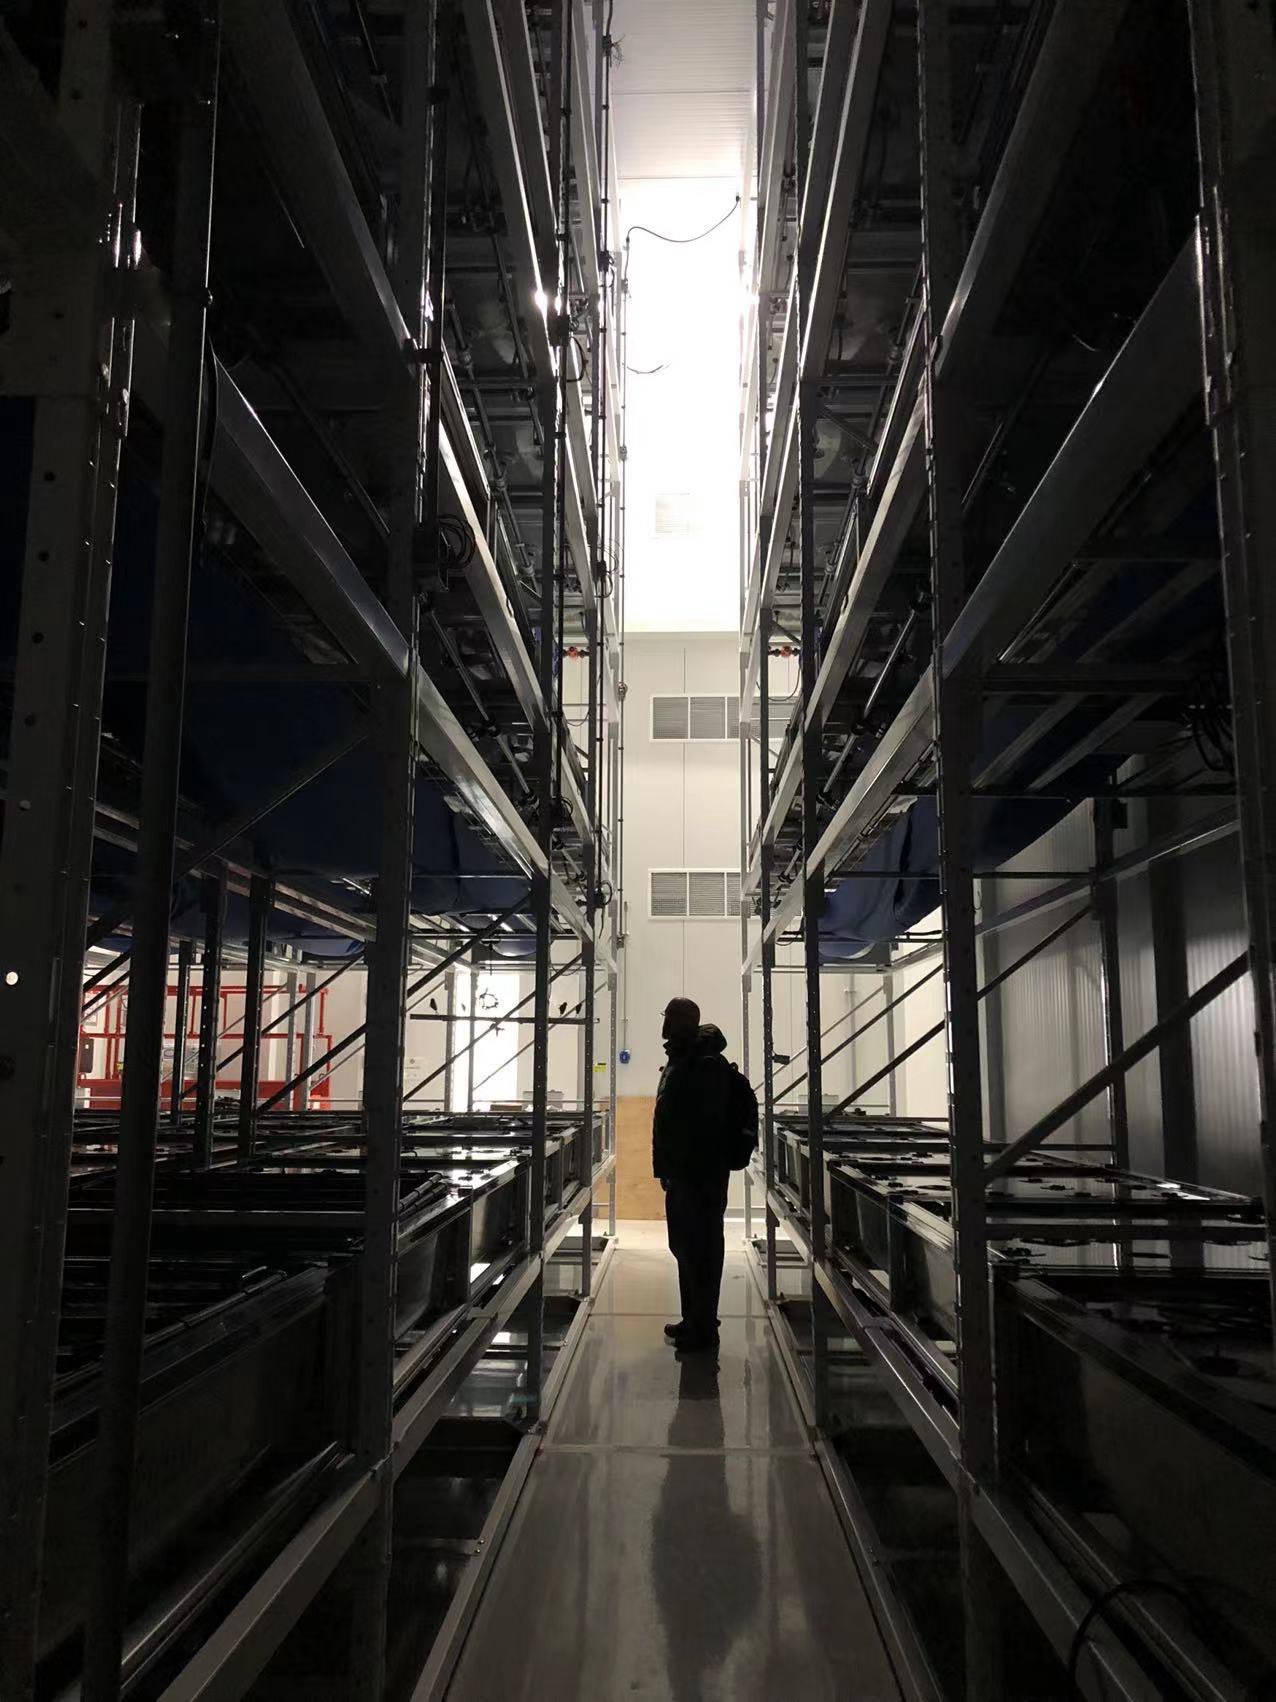
The elimination of soil media intrinsically helps a pest management program as it reduces the labor required to maintain a grow and the number of times the grow room doors are opened. Join that with effective automation with sensors and software, and you have immediate improvements in pest access. Sounds perfect, but we still have staff to maintain a facility and people become the number one source of contamination in a grow operation.

Figure 1: Example of Pythium Infected & Healthy Roots

Insects do damage directly to plants as they grow and procreate in a grow room. They also carry other pathogens that infect your plants. For example, root aphids, a very common problem, are a known carrier of the root pathogen, Pythium.

Procedures

One of the most common ways for pests to access your sealed, sterile, perfectly managed facilities are in the root stock of outsourced clones. If you must start your grow cycles with externally sourced clones, it is strongly recommended that you quarantine those clones to make sure that they do not import pest production facilities into your operation. Your operation management procedures must be complete. If you take cuttings from an internal nursery of mother plants, any pathogens present in your mother room will migrate through cuttings into your clones, supply lines, and subsequently, flower rooms.

Figure 2: Healthy Mothers & Clones, Onyx Agronomics

Start your gating process with questioning your employees and visitors. Do they grow at home or have they been to another grow operation in the last week? In the last day? You may be surprised by how many people that gain access to your grow will answer these questions in the affirmative.

Developing standard operating procedures (SOPs) that are followed by every employee and every visitor will significantly reduce your pest access and infection rates, and hence, increase your healthy harvests and increase your profitability. Procedures should include clothing, quarantining new genetics and cleaning procedures, such as baking or irradiating rooms to guarantee you begin with a sterile facility. This is covered more in the complete white paper.

Engineering Controls

Figure 3: Access Control: Air Shower, FarmaGrowers

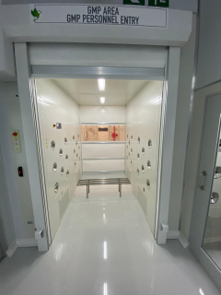
Technology is a wonderful thing but no replacement for regimented procedures. Considered a best practice, professional air showers, that bar access to internal facilities, provide an aggressive barrier for physical pests. These high velocity fan systems and exhaust methods blow off insects, pollen and debris before they proceed into your facility. From that access port into your grow space, positive air flow pressure should increase from the grow rooms, to the hallways, to the outside of your grow spaces. This positive airflow will always be pushing insects and airborne material out of your grow space and away from your plants.

Maintaining Oxidation Reduction Potential (ORP)

ORP is a relative measurement of water health. Perfect water is clear of all material, both inert and with life. Reverse osmosis (RO) is a standard way to clear water but it is not sufficient in removing microscopic biological organisms. UV and chemical methods are needed in addition to RO to clear water completely.

ORP is an electronic measurement in millivolts (mV) that represents the ability of a chemical substance to oxidize another substance. ORP meters are a developing area and when using a meter, it is important to track the change in ORP values rather than the absolute number. This is due to various methods that the different meters use to calculate the ORP values. More on this in the white paper.

Oxidizers

Figure 4: AEssenseGrows Aeroponic Nozzles

There are two significant ways to adjust the ORP of a fertilizer/irrigation (fertigation) solution. The first is by adding oxidizers. Examples are chemical oxidizers like hydrogen peroxide (H2O2), hypochlorous acid (HOCl), ozone (O3) and chlorine dioxide (ClO2). Adding these to a fertigation solution increases the ORP of the fertigation solution by oxidizing materials and organic matter. The key is to kill off the bad things and not affect the growth of plants. Again here, the absolute ORP metric is not the deciding factor in the health of a solution and the methods by which each chemical reaction occurs for each of these chemicals are different. This is compounded by the fact that different ORP meters will show different readings for the same solution.

Another wonderful thing about automation and aeroponic and hydroponic dosing systems is that they can automatically maintain oxidizing rates and our white papers explain the methods executed by today’s automation systems.

Water Chilling

Another way to adjust ORP is to reduce the water temperature of the reservoirs. Maintaining water temperature below the overall temperature of your grow rooms is imperative for minimal biological deposition and nutrient system health. Water chillers use a heat exchanger process to export heat from liquid nutrient dosing reservoirs and maintain desired temperatures.

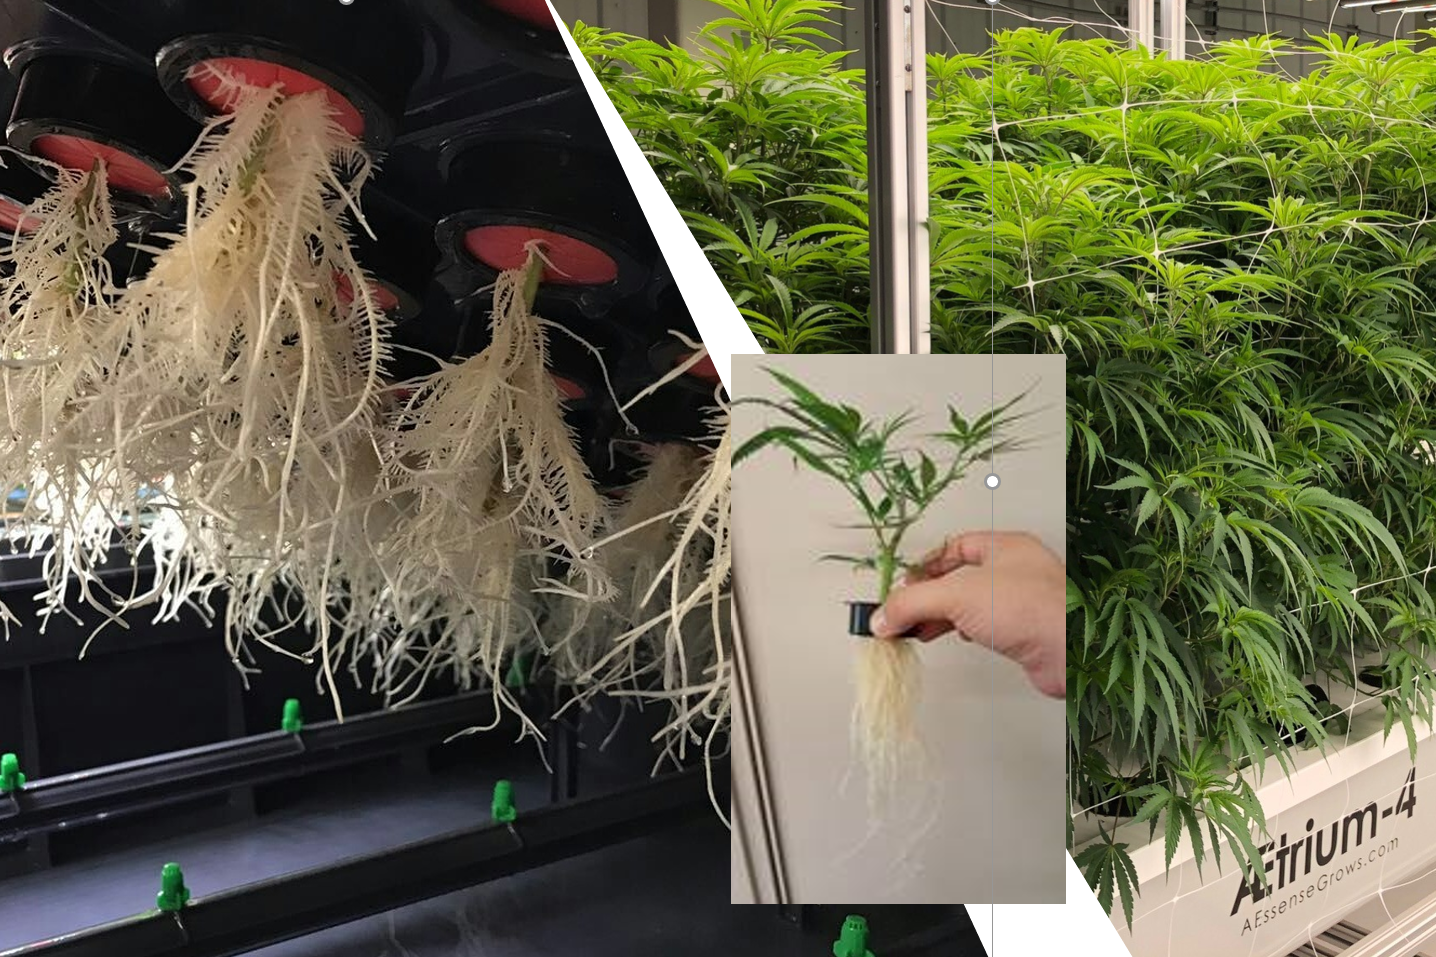
The benefit of managing ORP in aeroponic and hydroponic grow systems is highly accelerated growth. This is enhanced in aeroponics due to the effectively infinite oxygen exchanging gases at the surface of the plant roots. Nutrient droplets are sprayed or vaporized in parallel and provided to these root surfaces. Maximizing the timing and the best mineral nutrients to the root combustion is the art of grow recipe development. Great recipes drive superior yields and when combined with superior genetics and solid environmental controls, these plants will deliver spectacular profits to a grow operation.

Another Hero Award

Before closing this chapter, we have many cultivators that are producing stellar results with their operational and IPM procedures, so it is hard to choose just one leader. That said, our hats are off to RAIR Systems again and their director of cultivation, Ashley Hubbard. She and her team are determined to be successful and drive pests out of their operations with positive “little critters” and the best water treatment and management that we have seen. You are welcome to view the 7-episode walkthrough of the RAIR facility and their procedures here.

To download the complete guide and get to the beef quickly, please request the complete white paper Top Quality Cultivation Facilities here.

Stay tuned for Part 5 coming next week where we’ll discuss Genetics.

The 3-Legged Stool of Successful Grow Operations: Climate, Cultivation & Genetics – Part 3

By Phil Gibson
No Comments

This is Part 3 in The 3-Legged Stool of Successful Grow Operations series. Click here to see Part 1 and here to see Part 2. Stay tuned for Part 4, coming next week.

The Right Build Out

Aeroponic & hydroponic systems grow plants at a highly accelerated rate. A “clean room” type of construction approach is the best way to manage this type of grow operation. Starting with a facility that is completely void of any kind of wood or materials that are porous is a good start. Cellulose materials collect moisture and encourage mold and mildew formation no matter how good the sealant.

We have seen cultivation spaces built out of dry wall over wooden post construction and studs that look sealed and solid on the outside of walls but when repaired for plumbing or other expansion work, they are black inside and covered with nasty mold that no one wants near their grow space.

Panel construction over steel frames or steel studs with skins is a safer, more sterile approach than retrofitting a wooden structure. Panel construction offers the added benefit of rapid assembly and minimal labor costs. We have seen 300 light rooms assembled in a few days so it is both very cost effective and safely sealed for protected growth.

Room Sizes & Count

How do you best fill this space if you have a clean slate?

If you have unlimited space, temperature and humidity management should determine the room sizes in your facility. Room sizes that are square in dimensions tend to be easier to maintain from an environmental standpoint. Long narrow rooms are good for fan airflow but tend to be more expensive from a cooling and dehumidification point of view. The larger the room, the more likely that you will get “microclimates” within the room which can challenge yield optimization.

Now, of course, many grows are retrofits of existing structures so compromises can be necessary. We have found that cultivators that have both very large and mid-size rooms in the same facility (200 lights versus 70 lights) are consistently more successful in the 70 light rooms. These “smaller rooms (~1,500 ft2) out-yielded and out-performed the larger rooms using the same genetics and grow plans. Compartmentalization also minimizes the risk in the case that a calamity (i.e. pest infestation) strikes the room. In a large room scenario, the losses can damage your operation. For this reason, we recommend 70-100 light/tub rooms as a standard.

Rooms should also follow your nursery economics. Structuring your nursery to produce just enough clones/veg plants for your next flower room avoids wasted plant material and resources. Breaking a larger space down into individual rooms means that you need fewer veg plants to fill your flower room that week. The best way to optimize this is to have a number of rooms that are symmetrical with the number 8 (typical 8-week cycle genetics).

With 8 rooms running flower, you are able to plant one room per week for 8 weeks. In the 9th week, you start over on room 1. This continuous harvest process is highly efficient from a labor standpoint and it minimizes the size of your mothers room (cost center). Additional space can be applied to your flower rooms. If you do not have infinite space, even divisors work just as well; 2 or 4 rooms can be planted in sequence for the same optimization (for 2-room structures, harvest and replant 1 room every 4 weeks for example). The optimal structure (8, 16, 24, or more rooms) enables you to optimize your profitability. If any of this needs further explanation, please just ask.

Not photoshopped: An “ideal” 70-tub flower room in a CEA greenhouse (courtesy of FarmaGrowers, South Africa)

Within your room choice, movable rows or columns of tubs/lights also provides optimal yields.  Tubs/plants can be moved together for light usage efficiency and one 3-foot aisle can be opened for plant maintenance. Racking systems or movable trays/tubs make this convenient nowadays.

Floors

Concrete floors offer pockets for bacteria to collect and smolder.  As such, they have to be sealed.  Proper application of your sealant choice is required so that it does not peal up or crack after sealing. There are many benefits to sealed floors that is discussed in the white paper. Floor drains are the equivalent of a portal to Hell for a sterile grow operation. Avoid them at all costs.

Phased Construction

Tuning or optimizing you grow rooms for ideal flowering operation depends on your location. Our advice is that you build and optimize your facility in phases with the expectation that nothing is perfect and you will learn improvements in every phase of expansion. The immediate benefit is production that you can promote to your sales channels and revenue that starts as soon as possible to improve your profitability. This is also an excellent learning curve to apply to subsequent rooms. Our happiest customers are those that learned construction improvements in early rooms that were able to be applied to following rooms without headache. The ability to focus on one or two rooms also allows you to get the recipe correct rather than just relying on “winging it”.

Don’t Be In A Rush To Go Green

A 70-tub flower room (courtesy of FarmaGrowers, South Africa)

Validate your water supplies and their stability. Verify that the water in your aeroponic or hydroponic feeds that get to your plants are clean and sterile. This is much easier in a step-by-step fashion than in a crisis debug mode once production is in progress. Be very cautious about incoming clone supplies. We will talk about this more in the next chapter on Integrated Pest Management but incoming clones are a top pest vector that can contaminate your entire facility.

Warehouse Versus Greenhouse Cultivation Spaces

As we started out, controlling your environment is your most important concern. We have seen success in both indoor rooms and greenhouses. The defining success factor is controlling humidity and temperature. Modern sealed controlled environment (CEA) greenhouses do this well and CEA is somewhat of a given for indoor grows. More details on this in the white paper.

Packaging these recommendations gets you to the perfect body for your Formula 1 race car. Now, you are ready to look at some of the mechanics of protecting your operation from pesky little critters and biologicals that can derail your operation and weaken your engine.

Before we sign off this week, I wanted to highlight the ultimate build-out that we have seen so far.  Of course, there are many challengers that have done this well but at this point, FarmaGrowers in South Africa has the best thought out facility we have seen. They acquired Good Manufacturing Practice (GMP) & Good Agricultural & Collection Practice (GACP) certification early in their operations due to very well-thought-out designs. They are exporting to global markets without irradiation today. Certainly, many successful customers have beautifully thought-out operations and there are several upcoming facilities that offer amazing planning that will challenge for this crown, but for now. FarmaGrowers leads the pack in this aspect. See here for a walkthrough.

To download the complete guide and get to the beef quickly, please request the complete white paper Top Quality Cultivation Facilities here.

Stay tuned for Part 4 coming next week where we’ll discuss Integrated Pest Management.

The 3-Legged Stool of Successful Grow Operations: Climate, Cultivation & Genetics – Part 2

By Phil Gibson
No Comments

This is Part 2 in The 3-Legged Stool of Successful Grow Operations series. Click here to read Part 1 and stay tuned for Part 3 coming next week.

Aeroponic and hydroponic systems use zero-soil, so water is effectively our media and our transport mechanism for nutrition. Ideally, you start with clean, fresh water with “nothing” in it. Nothing in this case means no heavy metals, pesticides, bacteria or pathogens. There are some scary words in there so let’s talk through the best ways to get to “nothing.”

The first place to start is by testing your source water, whether it is surface, well or municipal water. This will give you an initial idea of how “empty” your water is. Water supplies shift over time, so it is also a very important input to monitor over time with annual or bi-annual testing. Clean water is the essence of success for aeroponics and a great way to lower your cost of production. With proper design and management, you can recycle and reuse 95%+ of the water you draw into your facility.

Reverse Osmosis (RO)

Mothers to clones: Happy clones, it’s all about the water

RO is the most common way to clear your incoming water. The process uses pressure filtration by forcing your water through a series of filters or meshes that block or extract large particles, organics and metals. Normally this is 98%-99% efficient. These systems do require attention and maintenance as they do have filters that are required to be changed regularly depending on the clarity of your original water source and the type of material filtered. This accomplishes a lot of your water clearing process to empty the balloon, but it does not clear the pesky biologicals or pathogens. RO is covered in detail in our “You are what you drink” webinar so look that over for a deeper explanation. There are a wide range of relatively low-cost suppliers based on capacity and filtration efficiency. From an operations standpoint, the key is to understand the filter replacement cycle and cost of replacement.

Ultraviolet Light (UV)

UV light can be used to clear organics and pathogens from water. The primary use is to clear origin water but it is also especially important for recovered water that you save from the humidity in your grow rooms. More on this below. One has to be cautious about the use of UV light. It will cause sunburn and eye damage with exposure so handle this resource with care. After RO & UV treatment, input water should be an empty balloon ready for the addition of your perfect nutrient salt recipe. There are a wide range of low-cost UV lighting solution suppliers from which to choose and they are easy to find.

Dehumidification & Recovery (DEHU)

Early root follicles: Reaching for first nutrients

The number one way to conserve water in an accelerated growth aeroponic grow room is to recapture the humidity that is transpired into the air as the plants grow. While DEHU water is effectively distilled water (or clear of particulates), it can be full of healthy little bacteria or pathogens than may be transported through air or residing in the equipment filters. Clearing these with UV light normally makes this water directly reusable in your fertigation systems. Not all dehumidifiers are perfect. Some metals used in their construction can leach into the recovered water, so this is worth a deeper look as you create your complete water system. Air treatment suppliers are covered in Part 1 of this series.

Used Fertigation Water, or “Flush”

At the start of the flower cycle, take your clean water (the empty balloon) and add your perfect nutrient salt flower recipe and deliver it to your plants. Over the grow cycle from flower to harvest, your plants will use portions of your nutrients and your balloon contents will drift from your target recipe you’re your desired cycle, clear or flush your reservoirs and reset your recipe by refilling your balloon to your exact targets. The exiting nutrient-rich “flush” water can also be recycled into your source water feed since the salts and metals present can be cleared from the mixture through the same RO process that your source water goes through. The end result is perfectly good recycled water savings.

Oxygen Reduction Potential (ORP)

Healthy roots reach for water: Early veg when plants get rolling

ORP is a measurement of an oxidizing agent. Oxidizing solutions are a common and inexpensive method of disinfecting water before and during use in hydroponic systems. Oxidizers can be used to monitor and deal with the “cleanliness” of a nutrient water solution while it is in use. Several oxidizing agents exist with the most common being: hydrogen peroxide, chlorine, ozone and chlorine dioxide. The characteristics of each of these agents and how they interact with the organic matter in solutions is different. The ideal concentrations to use in each situation to kill or control pathogens is unique and one of the topics covered by our “Letters from the AEssenseGrows plant science team” on our website. That deep dive is the subject of another paper.

When you take all of these subjects together and they are done right, you should be able to recycle 95% of your source water with a professional water treatment & recycling system.

Here, I would like highlight the ultimate water hero: Ashley Hubbard, director of cultivation at RAIR Cannabis. For a quick tour of her water treatment and recovery room, see here. No one that I know manages water better than RAIR Cannabis and Ashley leads the team there.

To download the complete guide and get to the beef quickly, please request the complete white paper Top Quality Cultivation Facilities here.

Stay tuned for Part 3 coming next week where we’ll discuss The Right Build Out.

The 3-Legged Stool of Successful Grow Operations: Climate, Cultivation & Genetics – Part 1

By Chris Wrenn, Phil Gibson
2 Comments

Ideal cannabis profits come from high demand/high selling prices and low production costs. The spread between those two, or margin, can determine the life or death of your business. We want to share this series of articles so that your next investment can be highly successful and high margin out-of-the-box.

Regardless of the grow method (soil, coco, rockwool, hydro or aero), every plant performs best in its own ideal environmental conditions. Experienced growers gained success through hard work, and just that, experience. Many have tried more advanced grow technologies, but shied away due to early trial failures or the complexity of maintaining chemistry across a grow facility. The wonderful thing now is that precision sensors and software controls eliminate the risk to robust healthy plants and harvest success. Growers are now able to both manage production while performing research in line with their operations.

We have learned a great deal working with our grow partners over the last 6 years. Every grow facility and location are different due to local weather, business environment and scale. This series of articles and guide, authored by our expert, Christopher Wrenn, will include recommendations of the most successful approaches we have seen here in North America and all over the world.

A 4-Layer fully aeroponic flower room using movable racking systems

Building top-quality cultivation facilities is no simple task. Cultivators are also looking for new help as they shift from older soil or media approaches to more efficient grow methods. One powerful method is aeroponics, which is very good at growing any type of plant in air in a sterile environment, with labor, nutrient and water savings.

Where possible, we will share key vendors that support healthy grow operations and (since it is World Series Time), customer examples that are knocking it out of the park. In today’s competitive business environment, it is critical to do what we can to increase profitability and survival in the face of steep headwinds. We want you to crush it and be “the last man standing.”

So, let’s get to it.

Climate: Environmental Control

We begin with a critical leg in your environment. The process of photosynthesis is more than just light, plant and moisture. We want to do more than just grow plants. We want to grow highly profitable plants. That means we have to accelerate photosynthesis so we are growing faster, bigger and more potent than our competitors.

The Vapor Pressure Deficit (VPD) is the amount of “drying power” available in the air surrounding your plants. This is a useful way to understand the amount of moisture your atmosphere can remove from your plants as they digest carbon dioxide and aspirate water and oxygen into the air around your plants. A higher vapor deficit is a good thing for growth; It is also a measurement of how much nutrient you can uptake into the plant roots and convert into size and potency in the canopy. We recommend that you have resources in your grow rooms to maintain your environment to within 5% of both your humidity and temperature targets for ideal results.

Onyx Agronomics is a Tier 3 indoor cultivator in the State of Washington. This is the canopy in one of their 8 flower rooms.

In our Top Quality Cultivation Facility white paper, we review environmental settings for temperature and humidity for mother, clone/veg and flower rooms for day and night light cycles from early cuttings through to end of harvest flush. Day temperatures can be up to 20% higher than night temperatures for example.

Cooling

Managing temperature may seem straight-forward but the heat generated by LED lights, HPS lights or the sun will vary across rooms, time exposure and with the distance of the light source from the plants. Measurement sensors should be distributed across rooms to monitor and trigger temperature resources.

Humidification/Dehumidification

This is a topic that can be underappreciated by cultivators. It is important to slowly transition humidity as you move plants from cuttings to clones, to veg and to flower. Beginning in a very humid stage to motivate root start, humidity will be stepped down from an opening near 90% down to an arid 50% in your end of flush flower rooms. We detail the transitions in 5% increments in the white paper.

The 4-Layer aeroponic flower room with movable racking systems from the side with a tall human for scale. One can do a lot with 30′ ceilings.

Relative Humidity (RH) and the related VPD are the key metrics to accelerating growth throughout the stages. Not sizing dehumidifiers correctly is one of the most common mistakes our grow partners learn about as they move to full production. In the first phase of turning cuttings from healthy mothers into rooted clones, hitting your target VPD to motivate root growth is the number one success factor. This will require the addition of humidity into your clone room. It is also typical to require raise the humidity of your flower rooms when you transition clone/veg plants from the high humidity clone/veg room into an initially dry flower room, otherwise the plants may go into shock as a result of the dramatic change.

As flowering begins, if humidity remains high, and the VPD is below target, the plants will not be moving nutrients and transpiring moisture. We have seen lowering the humidity from 70% in a flower room down to 50%, results in a yield increase from 50 grams to 90 grams of dry trim bud per plant, so a smooth transition can both accelerate growth and have a big impact on your margins and profitability.

Plants in aeroponics can truly have explosive growth. This means that they will also transpire moisture at an accelerated rate. Fast automated growth in aeroponics means increased humidity output. Sizing these critical systems for humidification/dehumidification are a critical part of the design process.

Airflow

Fans combined with your cooling/heating/humidity/dehu systems need to mix the air in a room to break the boundary layer at the leaf surface for transpiration. As we covered, VPD is critical to growth success. A dry surface motivates the plants to transpire moisture. We recommend flow rates across the canopy in a 0.5-1.5 meter/second rate to align to your genetics and where you are in the flowering process.

A raw facility before it gets outfitted.

Airflow and flowering means rich beautiful aromas are generated. Every facility has to consider odor control. If you are in a populated area, you will have ordinances and neighbors to satisfy. The best way to do this is to minimize the amount of air that exits a facility. This is also the cheapest approach.

Sterile HEPA filters and scrubbing systems clean air of pathogens and odor but they also need to circulate and “condition” air to the correct temperature and humidity levels before it can be recirculated into a room. Oftentimes, this is a good place to also recapture humidity and reinject it into your pure water cleaning systems.

Key vendors to talk to about sizing air treatment systems are SURNA, Quest, Desert Aire and AGS. Each of these vendors have specialties and tend to be superior partners in different regions of the world. We would be happy to introduce you to excellent support resources for air management systems.

To download the complete guide and get to the beef quickly, please request the complete white paper Top Quality Cultivation Facilities here.

Click here to see Part 2 where we discuss water quality and management.