Tag Archives: bug

Building An Integrated Pest Management Plan – Part 4

By Phil Gibson
No Comments

This is the fourth in a series of articles designed to introduce an integrated pest management framework for cannabis cultivation facilities. To see Part One, an overview of the plan and pest identification, click here. For Part Two, on pest monitoring and record keeping, click here. For Part Three, on preventative measures, click here. Part Five comes out next week on how to build a framework for control actions and how to monitor them. More to come!

This is Part 4: Direct Control Options

Even when the best methods are implemented and precautions are taken to protect your infrastructure, determined pests can penetrate your perimeter. Before you see crawling, hopping or flying insects, or sickly-looking plants, be sure to implement your physical protection (positive pressure airflow sealed facilities) and personal hygiene methods (shoe baths, sticky mats, & air shower entrances) to protect your crops. Equip your employees with personal protection equipment (PPE) proper gloves, masks and clothing as discussed in our last chapter, preventative measures.
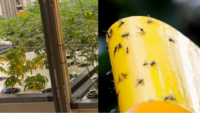
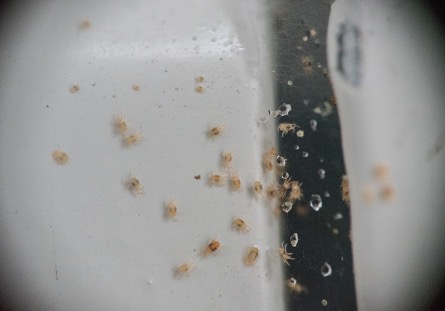
Figure 1: Fungus Gnats Unleashed In A Grow Room

When things do break-out beyond your acceptable thresholds, Direct Control Options include non-chemical microbial biofungicides, microbial bioinsecticides and direct chemical control options. Lots of big scary words there, all of which are toxic even under safe application methods and when used at recommended concentrations levels. This means training in their use and protective clothing is required. Careful application of these control options is necessary so you exterminate your pests and not your people! This seems obvious, but do not just “wing it.”

These chemical elements can be applied in diluted concentration levels, manual wipe-down application, concentrated flush frequencies, or root drench applications, foliar spray mist applications, HVAC aerial diffusions and aerial knock-down sprays. You may even choose to remove badly infected plants and destroy them completely.

Use experts when you are planning for these tools. All of these methods require handling and safety precautions. Proper breathing filters, eye & skin protection, as well as disposable gowns/hazmat suits should be used when applications are performed and until the applications have dissipated to safe levels. Be careful not to co-mingle removed plant materials. Gloves become transport and infection spreaders after use.

Please also be sure to review your harvest testing requirements and what treatments are safe for your consumers and within legal limits. No one wants to have their harvest rejected due to pesticide contamination.
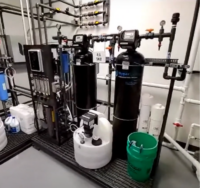
Figure 2: Municipal Water Treatment, RAIR Cannabis, Michigan

Clean-up after application may be required depending on the bioinsecticide or chemical that is used. Again, always ensure the safety of your employees and take precautions.

Start the application of your control options with your site map, room assignments and scout monitoring teams. Where does air flow into and within the facility? When your scouting team count logs go beyond your acceptable thresholds, here are some options for you.

Let’s begin with cleaning your irrigation and nutrient water sources. For a walk-through tutorial for incoming water treatment, humidity recovery and nutrient water recycling, please review the video tour of Water Treatment at RAIR Cannabis to see how an expert has done it.

From the IPM Planning Guide standpoint, peroxide and acid sterilizers can be used to clear irrigation water, for surface wipe-downs or as direct plant applications. We will cover those first. Caustic sterilizers require PPE for cleaning. Forgive my image here, we were just using water.

Concentrated Cleaners for Surfaces & Irrigation Sources (Hydrogen Peroxide & Sanitizers)

Plant interacting interfaces, i.e. surfaces, benches, walls, floors, trays, utensils, clippers, etc. should be sterilized with every use. Methods can include direct wipe-down or scrub, concentrated or diluted sprays or room vaporizers. A good example of hydrogen peroxide (H2O2) liquid would be a food grade sanitizer with 3-35% H2O2 content. Use acceptable diluted versions of these cleaners as appropriate.

Figure 3: Cleaning & Scrubbing, Where’s the PPE?

A commercial example would be Zerotol 2.0 with 27% H2O2 & their proprietary acid mix. Alternatively, you can use direct hydrogen peroxide generators from commercial sources to generate your H2O2 at various concentrations. More detailed examples are included in the complete Integrated Pest Management Guide (link at the end of this article). Establish your procedures for sterilizing your rooms and tools before you introduce plants, and describe what is to be done after every harvest and room turn. Track the cleaning materials used for your operational records. You will find this useful to track operational cost over time.

Sanitizing Acids for Surfaces & Irrigation Sources

Similar to hydrogen peroxide, hypochlorous acid (HOCl) comes in many commercial forms and can also be generated onsite using purchased generators. Commercial mix examples are UC Roots, Watermax and Athena Cleanse. They come in 0.028% to 15% concentrations. Self-generators range in output from highly precise 0.01% to 1% concentrations with more examples in the guide.

Treatment Tools

OK, so enough on cleaning preparation. Here are some tools that can be used to fight back against a pest intrusion:

Non-Chemical Microbial Biofungicide for Pathogens in Soil or Fertigation Water

Microbial fungicides are available to clear nutrient irrigation systems by minimizing pathogens and improving plant resistance to infections. Some fungicide versions target root pathogens by attacking the diseases directly. Others control or suppress common water carried challenges like pythium, rhizoctonia, phytophthora, fusarium and others. Brand names include Botanicare, Bonide, BioWorks, Actinovate, Mycostop and many more. Details covered in the guide.

Non-Chemical Microbial Bioinsecticides for Larval Stages

These biological tools attack the organisms or insects at a physical or mechanical way by breaking down the pest’s nervous system, biochemistry, or structural integrity (exoskeletons, etc.). These are engineered or living organisms (bugs to attack bugs) that are developed as targeted attacks for specific pests. Brand names are BioCeres, Botanigard, Venerate, Bio Solutions and others.

Minimal Risk Chemical Pesticides for Airborne Critters

Figure 3: Example Fungus Gnat Infestation – Royal Queen Seeds blog

Regularly approved for used in most locales, essential oils, natural acids (like citric acid) and insecticidal soap are commonly available in every hydroponic store. These work very well as safe spray “knock-down” insecticides for crawling or flying pests. Commercial examples use a proprietary mix of various oils, citric acids or isopropyl alcohol to do their task (examples in guide). Insecticidal soaps and fungicides for surface cleaning perform a similar purpose and typically use potassium salts or fatty acid mixtures.

Biochemical Pesticides

These tools are used to inhibit insect or fungal growth to acceptable levels. The multifaceted and commonly used neem oil comes in many commercial versions and is a naturally occurring pesticide extracted from the leaves and seeds of the neem tree. Example brand names are Bonide, Monterey, Triact and others. They range in concentrations from 0.9% to 70% concentrations. These oils suffocate living organisms or eliminate moisture to kill insects, spores or fungus at their initiation and throughout their lifespan.

Another option here are Azadirachtins. These act as insect growth regulators and disrupt the bugs natural evolution. Brand names are AzaGuard, AzaMax and others in the guide.

In summary, this week

We summarized some of the many pest control options available for water treatment, soil borne, intermediate or flying pests. We also covered various concentrations for these pesticide and sterilizer options. If you are not familiar with dilution ratios, %, PPM terms and how to apply the correct level of pesticide, you may find our plant science test kitchen blog on this topic of use here.

Chemical access and use should be restricted to employees familiar with their authorized application. PPE is very important to protect any employee that will come in contact with materials, liquids or vapors for chemical resources (gloves, boots, respirators, Tyvek (or equivalent protective wear) suits and eye protection or goggles.

For more detail on each of these treatments, you can see examples for your integrated pest management procedures in our complete white paper for Integrated Pest Management Recommendations, download the document here.

In our next chapter, Pest Population Control Actions, we will review control thresholds and example plans for a range of problems from biofilm build up to white flies and more. Our final chapter after that will suggest an emergency response framework and how to address pest outbreaks. See you next week.

Building An Integrated Pest Management Plan – Part 2

By Phil Gibson
No Comments

This is the second part of a series of articles designed to introduce an integrated pest management framework for cannabis cultivation facilities. To see Part One, click here. Part Three comes out next week and covers prioritization and preventative measures. Stay tuned for more!

This is Part 2: Pest Monitoring, Record Keeping, & Communications

Begin your pest identification process with a pest scouting document. You have already mapped out your facility with locations and potential access locations. For each of these pest types and room type assignments (mothers, clone, veg, flower), identify your employee scouts, their scouting methods, scouting frequency and the type of likely pest they are to search for and count.

Insect Types and Tracking Methods

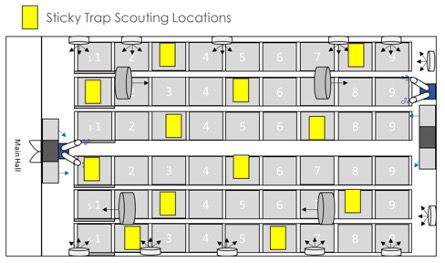
Figure 1: Example Sticky Trap Scouting Map

Insect pest types include, but are not limited to, airborne flying or crawling insects, their various egg, lymph, larvae, pupal shells or immature forms. Look for trace remnants, plant damage or feces that let you know they are present in some form. If they are at the mature jumping or flying stage, this can be harder to count, but sticky traps distributed on an even basis around your rooms can make the counting process more consistent from survey to survey.

Note airflows in your rooms and fan locations so migrations can be predicted once an infestation is located.

Insects Can Be Everywhere – Crawlers & Fliers

Insects would like to be everywhere so they come in many types from the obvious flying and crawling types to root-zone microscopic, aquatic, fungal, bacterial or biofilm based. For those of you using soil or media, root-zone insects can be beneficial by digesting and breaking down organic matter into something useful for your plant’s roots (earthworms) or harmful by feeding directly on your plant roots and sucking the life out of your plants from out-of-sight below (nematodes, maggots).

Common pests in a cannabis environment include:

  • White flies – Oval shaped eggs on the underside of leaves, nymphs- oval crawlers that suck on the undersides of leaves, larger stage nymphs with pupae shells as they form wings and mature white flies.
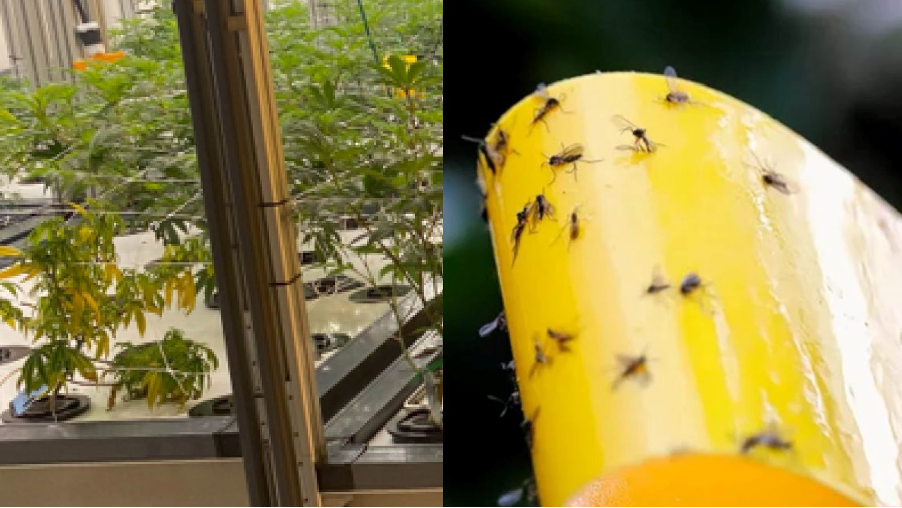
  • Fungus gnats – Clear eggs deposited in overly wet soil or dead plant matter. Clear or white colored larvae in the soil or media, these worm-like critters go through multiple stages of molting as they grow, eventually pupating into brown cocoons and finally small black or dark flies with clear wings that flutter around your plants and suck on your leaves.
  • The dreaded spider mite – Clear, hard to see eggs on the underside of your leaves. These six-legged tiny moving bubbles begin the feeding as larva, add 2 legs in the intermediate and mature nymph stages and finally the oval shaped spider mites that every grower despises, adding their webs around the tops of your plants as their nurseries suck the life out of your flowers.

Insect Transfers of Bacterial Infections

Figure 2: The Dreaded Spider Mite

Many crawlers or fliers you may discover in your grow operation do not generate fungus or bacteria on their own. However, they do routinely pick these up along the feeding way and bring them into your shop. Sap-feeding insects like leafhoppers and aphids use their needle mouths to pierce your leaves to suck on the sap that is nourishing your greenery. These insects consume the fluids and transfer bacteria as they feed. Whiteflies fit into this category of leaf sucking bacteria carrying pests. These pests can make your healthy grow rooms look blotchy with color drained out of your canopy.

Obvious symptoms of these flying/hopping pests are sticky leaves, black fungus mold, or yellowing leaves that show up at the bottom of your plants and work their way upward as the infestation progresses. Leaf curling or plant wilting will be visible in the more advanced stages of these pests.

As if crawlers were not bad enough, invisible fungus and bacteria that get into your water supplies can be the worst challenges of any grow.

Water Sourced Bacteria

Baseline testing of your feed water is critical for any facility. This is true whether you are using surface water, well water or municipal water. Please see the water tutorials on the AEssenseGrows website for details on how to test your water sources and what to look for in the mineral content.

Regardless of your water source, bacteria can be present directly in your water supply, or it can be introduced from infected plant materials from one of your suppliers. Pythium, fusarium and the latest plague, hop latent viroid, are some of the most common threats that attack your plants from your water or soil sources. These can come from your wells, feed lines or plant materials.

Reverse osmosis (RO) is a typical method to clear water of most pathogens and bacteria using water that is pressed through filters with very small membrane apertures. These small openings usually stop impurities, salts and microorganisms. Of course, these systems come in many different types and they have to be maintained to keep their performance quality. Don’t take shortcuts on your RO system.

Once your water source is clean, strict hygiene procedures for tools, equipment and plumbing are the best way to minimize these threats to your plants downstream from your water source. These cleaning efforts are not a guarantee. Pests can still get into even the best facilities. Symptoms of these maladies vary, but root rot, stunted growth, wilting, discolored roots or leaves, and in some cases, the quick death of your plants is possible depending on the critter.

Use your scouting regimen and your data mapping to locate infestations before they expand and damage your facility. Isolate outbreaks and take appropriate measures to address the pests. We will give you suggestions on prioritization and preventative measures to take in the next chapter.

Figure 3: Example Pythium Brown Roots

Pythium is one of the most commonly harbored soil or water carried pests. When it is present and gets into your plants through cuts, natural openings, root surfaces or leaves on weakened plants, it can be devastating. In hydroponic systems, dirty looking brown roots evolve into full root rot if not addressed. Pythium is often the cause. In soil operations, pythium often shows up as wilting or yellowing patches on leaves.

Your lab testing partners are your friends when it comes to bacterial or fungal infections. Many diseases can resemble one another. It is not hard to misdiagnose environmental stress such as overheating or overwatering for a bacterial problem. Test results are necessary to accurately diagnose a problem.

Truly Airborne Molds & Mildews

Pythium and fusarium are not just present in water. They can also be airborne. Grey mold (botrytis) and powdery mildew are also common airborne pests. Proper humidity, air movement, air filtration and sterilization using HEPA (High-Efficiency Particulate Air) filters, activated carbon filters (also filter smells) and UV light sterilization can minimize these problems in your grow. Powdery mildew is the primary evil spore in this category. Airflow and regular cleaning to discourage fungal growth is the best way to limit these pests.

In conclusion, this week

Now that we have talked about identification (and clearly, this is not an exhaustive list), we will move into how to build in the cultural methods to prevent these problems from taking hold and ruining your business. In later chapters, we will dive into prioritization, treatment and control options for infestations, finally moving into control actions and emergency response.

Your integrated management response is how you pull all of this together and use your IPM procedures to increase your profitability. For the complete white paper on Integrated Pest Management Recommendations, download the document here.

Part three comes out next week and will delve into the world of Preventative Measures. Stay tuned for more!

The Beginner’s Guide to Integrated Pest Management

By David Perkins
2 Comments

Formulating a Plan

In this article you will learn how to control pests and improve the health of your cannabis plants using integrated pest management, commonly referred to as IPM. This involves a multi-point strategy – there is no quick fix, nor is there one solution that will wipe out all your pest problems. Proper pest management requires patience, consistency and determination.

It is important to understand that not all pesticides are bad. While many are incredibly harmful not only to pests, but also humans, in this article I will educate you about some of the safer alternatives to traditional pesticides. It is possible to safely control unwanted pests in your cannabis garden without harming yourself, your employees or the natural habitat around you.

Every cultivation facility should have a well-thought-out plan for their pest management program. This program should account for the prevention, and if necessary, eradication of: spider mites, russet mites, fungus gnats, root aphids, thrips and caterpillars. These are just a few of the more common pests you’ll find in a cannabis garden. There could also be many other less commonly known bugs, so you have to be vigilant in looking closely at your plants, and the soil, at all times. Complete eradication of a targeted pest can be difficult. Once a pest has established itself, decimating or decreasing the population will require an aggressive regimen that includes spraying daily to control populations and prevent other pests from getting established.

Spraying or applying pesticides to the foliage of plants isn’t the only way to control or eradicate pest populations. There are many other ways that you can minimize the spread of pests without the use of pesticides. In greenhouse and outdoor grows, growing specific types of plants around the cultivation area will attract both beneficial and predator bugs that will naturally control pest populations. Some plants that attract these bugs are: mint, peppers, and marigold. Beneficial and predator bugs, such as ladybugs, predator wasps and predator mites, can control unwanted pest populations in the area before they even have a chance to become a problem in your garden. Plants and flowers that attract bees, birds and insects will also create helpful bio- diversity, making it more difficult for the unwanted pests to thrive.

For indoor cultivation, it is imperative that you have your cultivation facility set up for a proper workflow. If you already have pests, you need to make sure you are not contaminating the rest of your facility when going from one area to the next. Make sure that you only go to contaminated areas at the very end of your day, and when you’re done working in that area, you must immediately exit the building. Do not ever walk back through the uncontaminated parts of your facility or the pests will spread quickly.

An aphid on a plant in a greenhouse

When most people think of pests in their cannabis garden they think of the more common varieties: spider mites, russet mites, aphids and thrips. However, there are also soil-dwelling pests that can exist, without your knowledge. These will decrease the health and vigor of your plants, without you even knowing they’re there, if you’re not careful to check for them. Some of the soil dwelling pests that plague cannabis plants are: root aphids, fungus gnat larvae and grubs. It is just as important to control the pests below the soil, feeding on your roots, as it is to control the pests that feed above soil on your plants.

Maintaining healthy plants is essential to controlling pest populations, both on the foliage and below the soil. Healthy plants will have an easier time fighting off pests than unhealthy plants. Plants have immune systems just like humans, and the stronger the plant’s immune system, the more likely it will be able to ward off pests and diseases. Allowing a plant to reach its full potential, by minimizing pests, means your plants will also have a better quality, smell and flavor, not to mention a bigger yield.

Worker Safety, Regulation and REI times

The application of pesticides requires certification from the state agricultural department. In certain situations, depending on the type of pesticide and method of application, a license may even be required. The application of pesticides without proper certification is against the law. Applying pesticides in a manner that is not in accordance with the label and instructions is also a violation of law.

The proper personal protective equipment (PPE) is required for anybody handling, mixing or applying pesticides. Employees can be a liability to your company if they are applying pesticides improperly. Make sure you and your entire staff are well educated about pesticide use requirements and limitations, prior to usage, and that only a properly certified person is handling the mixing and application at your facility.

The author, David Perkins, In his greenhouse after using insect killing soap.

After a pesticide is applied, you must abide by the re-entry interval (REI). This is the required time period limiting all workers from re-entry into areas where pesticides have been applied. This time period will vary depending on the type of pesticide used and the method of application. In some instances, pesticides applied in the last 30 days may require employee training before work can be done in those areas.

The misuse of or improper handling of pesticides is not only unlawful and dangerous to human health, but can also cause environmental damage to waterways and wildlife. The direct effects of pesticides on wildlife include acute poisoning, immunotoxicity, endocrine disruption, reproductive failure, altered morphology and growth rates and changes in behavior. Pesticides can indirectly impact wildlife through reduction of food resources and refuses, starvation due to decreased prey availability, hypothermia and secondary poisoning. Section 1602 of the California Fish and Game Code governs requirements for permitting of any project where pesticides will be used, and strictly regulates the disposal of all waste and run-off. It is imperative to know the regulations and to abide by them, or heavy fines will ensue!

Using Pesticides in a Regulated Market

Knowing which pesticides you can’t use, to avoid failing mandatory state testing, is just as important as knowing which ones you can use safely to pass required testing. Most states with regulated markets have strict limitations on the pesticides that can be used in cannabis cultivation. Pesticide use in the cultivation of cannabis is the most strictly regulated in the agriculture industry; the pesticides allowed for use in cannabis cultivation are far more limited than any other crop.

Photo: Michelle Tribe, Flickr

Just because a product is certified organic does not mean that it can be used, or that it is safe to be consumed or ingested. Oftentimes when cannabis flower alone is tested it will not fail or show a detectable amount of pesticides or heavy metals. However, when that flower is turned into concentrates, banned substances are then detected in testing, leading to test failures.

Cannabis cultivation facilities that are located on land that was previously used for conventional agriculture, or located near vineyards or other agricultural crops that are heavily sprayed with harmful pesticides, run a very high-risk failing testing. This is because of either spray drift from nearby agriculture, or residual pesticides and heavy metals left in the soil from previous crops that were using pesticides banned for cannabis cultivation. Accordingly, if you’re going to be growing outdoors or in a greenhouse, it is imperative that you get a soil and water test prior to cultivation, so you can determine if there is any potential for test failures due to pesticides or heavy metals in the soil or water in that area. 

Proper Application – Using the Right Tools in the Right Way at the Right Time

One of the most important factors in pest management is proper identification of pests and proper application and coverage of pesticides. It does not require an entomology degree to identify insects, these days there is a lot of information online that can help you identify cannabis pests. Proper identification of insects can make the difference between success and failure. With a good eye and a microscope, if you do your research, you can control most insects in your garden.

In order to control pests in your garden you must get proper coverage of the foliage of the plant when you are applying pesticides. There are different types of equipment that are commonly used to apply pesticides in cannabis cultivation: backpack sprayers, foggers, and airless paint sprayers are the most common. An alternative method involves using an automated dosing system such as a dosatron, which injects fertilizer or pesticides at a specific ratio into your water lines, allowing you to use only the exact amount of pesticide you need. That way you avoid wasting money on unused pesticides. It is also safer for employees because it minimizes employee exposure, since there is no mixing required, and it allows for a large volume to be sprayed, without refilling a tank or a backpack sprayer.

No matter what you are using you must ensure you get the proper coverage on your plants in order to control pests. The temperature and humidity of your cultivation area, as well as the PH and temperature of the pesticide solution, all factor into the success of your IPM. For example, PFR 97 needs to be applied at a higher humidity range, around 70% to be most effective. In some areas this is not possible so repeated applications may be required to ensure the application is effective. A high PH or alkaline PH can cause alkaline hydrolysis which will make your pesticide solution less effective and will dictate how long your pesticides remain effective after they are mixed. It is therefore important to use your pesticide solution as soon as you make it; don’t let it sit around for long periods of time before use or it will be less effective.

In cannabis cultivation there are two different primary growth cycles: vegetative and flower. These cycles require different IPM strategies. In general, during the flowering cycle, pesticides should not be applied after the second week, with some limited exceptions i.e. for outdoor cultivation there is a longer window to spray since the flower set takes longer than a plant being grown inside, or in a light deprivation greenhouse, where there is a 12/12 flowering cycle.

Starting with an immaculate vegetation room is crucial to maintaining pest and mold free plants in the flowering cycle.

For the vegetative (non-flowering) cycle, a strict rotation of foliage spray applications targeting not only pests, but also molds and pathogens, will be necessary to avoid a quick onset of infestation. Starting with an immaculate vegetation room is crucial to maintaining pest and mold free plants in the flowering cycle. Preventative sprays that are safe for use include: safer soap (contact kill) for soft bodied chewing insects; Regalia (biological control) for powdery mildew; and PFR 97 (biological control) for soft bodied chewing insects. It is also helpful to spray kelp, which strengthens the cell walls of plants, making the plant healthier, and thus enabling the plant to better defend itself from pests and diseases. Also, Bacillus thuringiensis (Bt) is useful to prevent or kill caterpillars.

The best way to control a pest infestation in the flowering cycle is at the very beginning on day one. You must start aggressively, with a three-way control consisting of a contact kill and preventative during days 1-14; preventative and biological control during days 10-18; and then release predator bugs on day 25, for optimal results. Knocking back the population with an effective contact kill pesticide early on is essential to ultimately lowering populations throughout the grow cycle, so that you can spray a biological control to preclude them from returning, before you release the predatory bugs at the end of the cycle.

Biological controls can take anywhere from 3 to 10 days before they are effective. Biological pesticides are selected strains of bacteria or fungus. When the plant tissue is eaten by a targeted pest, the bacteria kills the pest from the inside providing control without having to spray pesticides repeatedly. Predator bugs are the last line of defense, used in late flowering. They can be used indoors, outdoors and in greenhouses. An example of a common predator bug is Amblyseius californicus used to control low populations of spider mites, but there are many different varieties and they are specific depending on the type of pest population you seek to control.

A common concern with the use of predatory bugs, is whether they will be present when the flowers are harvested. However, if there is no food for the bugs (i.e. pests) the predator bugs will leave in search of food elsewhere. Further, indoor predator bugs are usually very small in size and difficult to see to an untrained eye. It is very unlikely to see any signs of predator bugs near the end of the flowering cycle, or in the finished flower product. Even when using bigger predator bugs, the bugs will leave the plants when harvested and dried.

Having pests can be very stressful. It is not uncommon to have bugs, pests, rodents, animals and birds cause damage in cannabis gardens. Making an informed decision based on science and not on unproven assumptions can determine how successful you are at pest management. There are many factors that go into pest management and no one situation is the same. You must be dedicated and consistent; pest management never stops. You will always have something ready to invade your garden. Prepare, plan, prevent and repeat!

Top 3 Ways Cultivation Methods Must Change with Regulations

By David Perkins
No Comments

There are obvious upsides and downsides to cannabis regulation. Gone are the days when it was a free for all, for outlaws growing in California’s hills, under the limited protections California’s medical cannabis laws provided. While there is no longer the threat of arrest and incarceration, for the most part, there are also a lot of hoops to jump through, and new rules and standards to contend with. This article highlights three areas in which your cultivation plan must necessarily change due to the new regulations.

1. Integrated Pest Management (IPM) is limited

In the new regulated market, products that were once widely used are now no longer allowed. Prior to regulation, in the days of Prop 215, you could spray your plants with just about anything, since there was no testing mandated for the products that were being sold. However, people unfortunately got sick and experienced negative reactions, with products like Eagle 20, which contains mycobutinol, and Avid, which contains bifenthrin. Accordingly, under new regulations there are thankfully much more stringent standards dictating what pesticides can be used. It’s ironic that for most of the “medical marijuana” era in California there were no mandatory testing requirements for the THC content of your cannabis, let alone testing for toxins, including pesticides, molds or heavy metals.

You need to have a very thorough pest management plan to make sure your bug populations are always in check. Given that there are a small number of allowable products for pest control in the regulated market, this can be tricky. You need to be extremely familiar with what is and isn’t allowed in today’s regulations. You must also make sure that someone who is certified to apply pesticides is applying them.

Photo: Michelle Tribe, Flickr

As a word of caution, there have been instances where approved pesticides were found to have old unused chemicals (that are not approved for use) from the manufacturing process in them. They may have only occurred in very small amounts, but they are harmful to humans and there is no lawful way to dispose of them.

Further, the presence of these harmful chemicals can cause your finished product to fail when undergoing mandated testing.

Rather than using risky chemicals, the best solution for (early detected) control of pests is the use of beneficial insects. Although they may not be the best solution for an infestation, predator bugs like Neoseiulus Californicus can efficiently control small populations of spider mites while ladybugs are good to limit aphids. Strategic planning of your IPM is one of the best ways to keep pest levels in check.

2. Plant size and plant count matter more than ever

Despite widespread legalization in the past few years for both the medical and recreational markets in the United States, the black market is still rampant and most cannabis is still being produced illegally in the US and internationally.

Maximizing plant canopy space is essential to a profitable business in today’s market

Generally speaking, in the black market, the less plants you have the better, as high plant counts lead to longer sentences of incarceration. With the passage of prop 215 in 1996, many growers, especially outdoor, started growing their plants as big as they possibly could because most limitations were based on plant counts. Some outdoor growers were able to cultivate plants that yielded over 10 pounds per plant. These days regulations are based on canopy measurements, meaning you can grow as many plants as you want within a defined, limited square footage area. This is where “light deprivation,” a method used to force plants into flowering, becomes favorable as it allows 2-4 harvests per year instead of just one. It is a much more intensive way of growing when you have tens of thousands of plants. While it is easier to plant, cultivate and harvest a larger number of smaller plants, it also requires a much more detailed level of planning and organization.

In order to achieve 4 harvests per year, you must have a well thought out cultivation plan and an all-star staff, but if you are able to accomplish this, you can increase your revenue significantly. Maximizing plant canopy space is essential to a profitable business in today’s market, and to do that will require more detailed planning, better organization and proper crop management.

3. How you grow and what equipment you use

With regulation comes liability for defects or injury. It is essential that all equipment used is approved for its intended use. Traditionally, cannabis was cultivated in secrecy in the black market. This led to many unsafe grow rooms being built by people who did not have the proper skills to be undertaking projects such as converting a garage into a grow room or handling the electrical and plumbing running into them. Accordingly, there were many instances of damages to property or injuries to people because of this. Now that counties and states permit cannabis cultivation facilities, the infrastructure and labor that is done must meet regulated building codes and general safety requirements. It is therefore imperative to know the codes and regulations and hire a professional that does, to ensure you meet the standards in order to avoid potential liability.

Larger scale cultivation requires bigger and more expensive equipment. Cultivation facilities are more likely to have sophisticated equipment, such as chiller systems, that are designed to control the grow room environment. While very efficient, some are not intended to be used specifically for cannabis cultivation, and can therefore be difficult to control and maintain. They perform very specific functions, and when not properly tuned to your conditions, can malfunction by prioritizing dehumidification over cooling. This can be a real challenge in warmer climates when temperatures rise, requiring cooling, but also necessitate removal of moisture from the cultivation space.

Larger scale cultivation requires bigger and more expensive equipment.

On the other hand, there is new technology that can make a huge difference in the success of your cultivation. I recently worked with two different companies that specialize in root zone heating systems. One manufactured equipment for root zone heating and cooling of 10k sq ft raised beds that had never been used in California previously. The other company specialized in root zone heating using radiant floor heat. They both worked as intended to maintain a constant root zone temperature, which increased plant health, and ultimately increased yield.

Many counties require data collection from your cultivation, requiring you to track the amount of water and nutrients used. Therefore, another useful tool you can use to increase efficiency, is data collection software that will allow you to collect different information about the amount of water and nutrients used, as well as specific information about the conditions in your grow medium. You can also record and display temperature and humidity readings in your grow room, in real time remotely through Wi-Fi, that you can then access from your phone or computer from anywhere in the world. This can be a useful tool when documenting information that your county, state or investors may require from you. Further, the ability to collect and analyze data will allow you to identify areas of inefficiency in order to correct and optimize your grow room’s potential. While you can achieve these same goals with simple in-line water meters, keeping track of nutrients and pesticides is not as easy. Data collection in the most basic form, using a pen and paper, can be an inaccurate and an inefficient use of time, and can easily be misplaced or ruined. Therefore, simple data software collection programs are the best solution to make the process simple and hassle free.

While it is nice to have state of the art equipment, if it does not work properly, or cannot be easily maintained, it will not be worth it in the long run and you will never see a return on your investment. Innovation comes with a price; using equipment that is cutting edge can be risky, but on the flip side, when done properly it can give you a big advantage over your competitors.

In switching from the black market to the regulated market, these three areas have proven to be the biggest areas of change and have presented the biggest challenges. It is important you consider these necessary changes, and make a solid plan before you begin your cultivation. This is where a cultivation consultant can help.

photo of outdoor grow operation

How to Reduce Mold & Contaminants in Indoor, Greenhouse and Outdoor Grows

By Ketch DeGabrielle
No Comments
photo of outdoor grow operation

Controlling your grow environment doesn’t start when you germinate your first seeds, it starts before you build your grow. There are steps you can take that will have a significant impact on mold growth and contamination, and these will vary based on the grow environment you choose.

Below is a roadmap to where each grow environment stands in terms of mold and contamination risk, and simple steps you can take to mitigate these factors.

Outdoor

The benefits of an outdoor grow are significant – using natural sunlight to grow plants is both inexpensive and environmentally sound. However, it allows the least amount of control and makes plants susceptible to weather conditions and outdoor contaminants including dust, wind, rain and insects. Depending on humidity and precipitation levels, mold can be a big issue as well.

Outdoor growing has obvious benefits, such as natural sunlight, but may also require extra steps to prevent contamination

When selecting an outdoor area for a cannabis farm, there are two important factors to consider: location and neighboring farmland. Geographical environments and sub-climates vary and once you have purchased land, you are committed, so be sure to consider these factors prior to purchase.

While arid desert climates have abundant sunlight and long growing seasons, flat, dry lands are subject to dust-storms, flash floods and exceedingly high winds that can damage crops. Conversely, more protected areas often have high humidity and rainfall late in the season, which can create huge issues with bud rot and mold. Neighboring farms also have an impact on your grow, so be sure to find out what they cultivate, what they spray, their harvest schedule and how they run their operation. Large farming equipment kicks up a lot of contaminant-laden dust and can damage crops by displacing insects to your farm if they harvest before you. Pesticide drift is also a major issue as even tiny amounts from a neighbor’s farm can cause your crops to fail testing, depending on what state you are in.

With outdoor grow environments always at the mercy of Mother Nature, any cultivator is wise to control contamination potential on the ground. Cover soil and protect your crop by planting cover crops and laying plastic mulch on as much ground as reasonable. In many cases it makes sense to irrigate uncultivated parts of your farm just to keep dust down.

Greenhouse

Greenhouses are the future of cannabis cultivation. They allow growers to capture the full spectrum and power of the sun while lessening environmental impact and operating expenses, while still being able to precisely control the environment to grow great cannabis. With recent advancements in greenhouse technology such as automated control systems, positive pressure, geothermal heating or cooling and LED supplemental lighting, greenhouses are the future. However, older or economy greenhouses that take in unfiltered air from outside still have a medium amount of mold and contamination risk.

A greenhouse grow facility

Before building your greenhouse, study the area while taking into account climate, weather conditions and sun exposure. Excessively windy areas can blow in contaminants, and extremely hot climates make cooling the greenhouse interior a challenging and costly endeavor.

There are several simple operational tactics to reduce contaminants in a greenhouse. Add a thrip screen to keep insects out, thoroughly clean pad walls with an oxidizing agent after each cycle, and keep plants at least 10 feet from pad walls. Plan to flip the entire greenhouse at once so that you can clean the greenhouse top to bottom before your next crop. A continuous harvest in your greenhouse allows contaminants to jump from one plant to the next and reduces the ability to control your environment and eliminate problems at the end of a cycle. Lastly, open shade curtains slowly in the morning. This prevents temperature inversion and condensation, which can cause water drops to fall from the ceiling and transfer contaminants onto plants below.

Indoor

An indoor environment offers ultimate control to any grow operation. Cultivators can grow high-quality cannabis with the smallest potential for yeast and mold growth. Unfortunately, indoor environments are extremely expensive, inefficient and environmentally costly.

Talltrees
An indoor cannabis operation set up (Image: Tall Trees LED Company)

With indoor grow environments, keeping mold and contaminants at bay comes down to following a regimented plan that keeps all grow aspects clean and in order. To keep your grow environment clean, change HVAC filters multiple times a month. It’s also important to install HEPA filters and UV lights in HVAC systems to further reduce contamination threats. Clearly mark air returns if they are near the ground and keep those areas free of clutter. They are the lungs of your grow. Also, stop using brooms in the grow space. They stir up a lot of contaminants that have settled to the floor. Instead, use HEPA filter backpack vacuums or install a central vacuum system. Set up a “dirty room” for anything messy on a separate HVAC system, and be sure to thoroughly clean pots after every harvest cycle.

Learn more about reducing mold and contaminants in an indoor or greenhouse grow in another article from our series: 10 Ways to Reduce Mold in Your Grow.