Tag Archives: gnat

Building An Integrated Pest Management Plan – Part 5

By Phil Gibson
No Comments

This is the fifth in a series of articles designed to introduce an integrated pest management framework for cannabis cultivation facilities. To see Part One, an overview of the plan and pest identification, click here. For Part Two, on pest monitoring and record keeping, click here. For Part Three, on preventative measures, click here. For Part Four, control methods, click here. Our final chapter, Part Six, discussing emergency response, comes out next week to wrap it all up.

This is Part 5: Pest Control – Taking Action

Previous chapters have covered the many preparations you can take to protect your facilities from pest attacks and outbreaks before they get started. This chapter will summarize the concepts of pest control thresholds and the actions you can take for the painful event when you surpass those limits (and various examples). The Integrated Pest Management (IPM) recommendations provide you with a framework for these plans.

Figure 1: Cleaning regimen, the heart of successful operations – no biofilm buildups

Preventative actions are part of your regular site operations; in other words, they are how you avoid problems before they happen. Just to hit this action one more time: cleaning must be fundamental to your facility. Water sanitation and changing filters must be done on schedule and frequently to avoid biofilm build up and nasty self-multiplying eco-systems.

For each of the rooms in your facility, identify the acceptable tolerance level for each type of pest that you may encounter. Define the intervention levels per room: preventative, direct action and escalated direct action. Follow your predefined procedures and defend your facility. Let’s cover high, medium and low tolerance example responses.

High Threshold for Tolerance

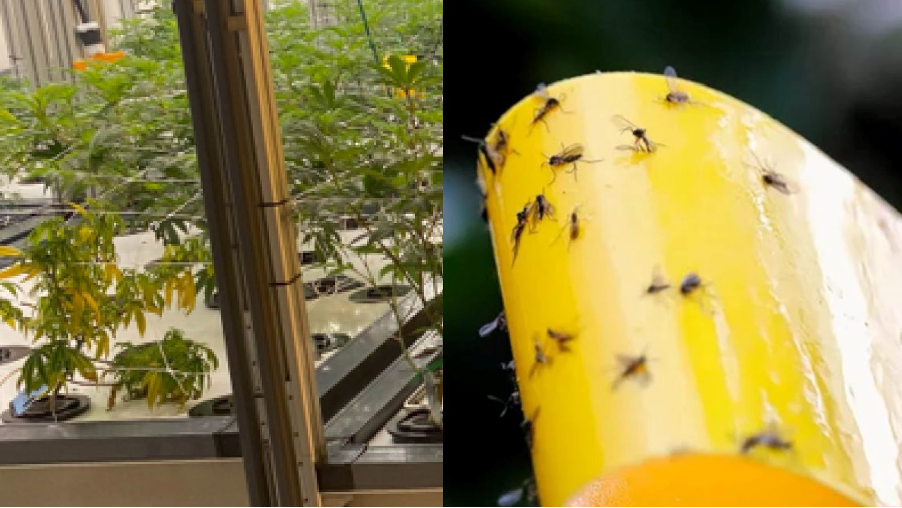
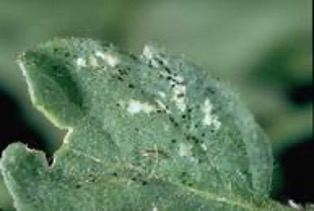
For example, the impact on your plants, your profits and your yields from the discovery of a white fly fluttering inside of one of your flower rooms may be very small. If this presence is late in your harvest cycle, your tolerance of this discovery may be very high. Your team could take preventative actions to clean the room more aggressively or to check your traps more frequently, but you are probably not going to want to invest in aggressive actions at that time in the harvest cycle.

Move from passive observation to the shake test. With sticky traps in place, shake or brush your plants. Do you see the bug counts increase on your test sheets?

Figure 2: Thrip Evidence c/o UC ANR Publication 7429

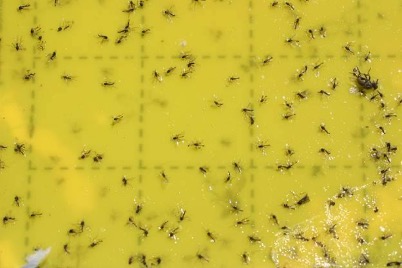
As that infestation grows, you may set a threshold for direct action (i.e. 5-10 flies per trap per week). If you reach that level, implement a treatment action with a non-chemical microbial biofungicide to stop growth in the roots or neem oil as a direct chemical action.

When you reach your escalated threshold of 10-20 flies per trap or direct plant damage is apparent, an infestation is more serious. In that event, you may choose to take steps to directly reduce the pest population with knock down sprays of approved direct chemical pesticides like citric acid or insecticidal soaps. Be sure to use your Personal Protective Equipment (PPE) for breathing and contact safety if you get into this situation.

Medium Threshold for Tolerance

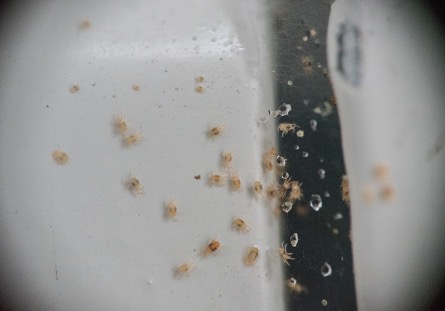
Depending on the timing in your harvest cycle, the discovery of fungus gnats in your grow room may trigger a medium level alarm for you. Is the location, a small example with a minimal frequency? Is this addressable with additional attention to cleaning the area and longer dry periods in the irrigation or is this the beginnings of an infestation? Fungus gnats feed off of fungus or organic matter in soil triggered from an overly moist root environment. You may choose to react with immediate cleaning at the first existence in a room. Or you could set your “Medium” level alert status to be additional sticky trap distribution at the first visible gnat. If those counts reach 10-20 gnats per sticky trap per week, begin your foliar spray regimen with Zerotol or the equivalent.

Figure 3: Fungus Gnats

If these counts do not respond to your treatment, meaning that the next sticky trap count reaches beyond 20+ gnats per trap or visible direct plant damage, then institute your root drench protocol with a solution of BActive 1-2 times per week until the problem is under control and the counts are reduced. If the growth continues, look to approved pesticides in your area (as an example, AzaGuard Asadirectin).

Low Threshold for Tolerance

Alternatively, you may have a unified air circulation system due to facility limitations. Your air circulation may be shared across all of your mother plants, clones, veg and flowering plant areas. In that case, any presence of an airborne fungal infection like powdery mildew would have a very low tolerance of acceptance. Selective de-leafing of the infection and increased airflow are your first defense. Any visible presence beyond that would trigger a low threshold alert and immediately start a preventative action, such as carefully removing the infected plant material much wider than a few leaves and treating the area with foliar sprays like Zerotol (hydrogen peroxide plus).

If the penetration continues or expands, treatment would escalate to minimal risk pesticide follow up and observation. Chemical oils or citric acid might be in your mix in this case.

Figure 4: Powdery mildew in cannabis – Ryan Douglas Cultivation LLC

Finally, if repetitive treatments once a week are not turning the tide, increasing to once per day or even once per ON/OFF lighting cycle until the infection is controlled. At this point, you may decide to strip the room down and start over. Clearly the choice to “throw in the towel” is a total loss of the crop, but it may be the best option relative to minimal yields and failed flowers that will not sell.

Pest Control Actions

Our Integrated Pest Management recommendations paper gives you examples of what to consider for plans with white flies, fungus gnats, root aphids, powdery mildew and biofilm on plumbing or surfaces. These follow the preventative action, direct action, escalated direct action and pesticide approaches for each example. These are options to plan for water sources, root treatment, tunneling, crawling and flying phases.

In summary this week

As covered, preventative measures are your best defense. Hire expert consultants and plan these well. Escalate your response based on your scouting activity and your plan. Add your sticky traps, de-leafing, root drench, foliar sprays or knock down sprays as defined by your pest population control actions document.

For more detail on each of these treatments, you can see examples for your integrated pest management procedures in our complete white paper for Integrated Pest Management Recommendations, download the document here.

In our final chapter, Emergency Response, we will review control thresholds and example plans for a range of problems from biofilm build up to white flies and more.

Our final chapter after will describe emergency response framework and reviewing your complete plans. See you next week.

Building An Integrated Pest Management Plan – Part 4

By Phil Gibson
No Comments

This is the fourth in a series of articles designed to introduce an integrated pest management framework for cannabis cultivation facilities. To see Part One, an overview of the plan and pest identification, click here. For Part Two, on pest monitoring and record keeping, click here. For Part Three, on preventative measures, click here. Part Five comes out next week on how to build a framework for control actions and how to monitor them. More to come!

This is Part 4: Direct Control Options

Even when the best methods are implemented and precautions are taken to protect your infrastructure, determined pests can penetrate your perimeter. Before you see crawling, hopping or flying insects, or sickly-looking plants, be sure to implement your physical protection (positive pressure airflow sealed facilities) and personal hygiene methods (shoe baths, sticky mats, & air shower entrances) to protect your crops. Equip your employees with personal protection equipment (PPE) proper gloves, masks and clothing as discussed in our last chapter, preventative measures.

Figure 1: Fungus Gnats Unleashed In A Grow Room

When things do break-out beyond your acceptable thresholds, Direct Control Options include non-chemical microbial biofungicides, microbial bioinsecticides and direct chemical control options. Lots of big scary words there, all of which are toxic even under safe application methods and when used at recommended concentrations levels. This means training in their use and protective clothing is required. Careful application of these control options is necessary so you exterminate your pests and not your people! This seems obvious, but do not just “wing it.”

These chemical elements can be applied in diluted concentration levels, manual wipe-down application, concentrated flush frequencies, or root drench applications, foliar spray mist applications, HVAC aerial diffusions and aerial knock-down sprays. You may even choose to remove badly infected plants and destroy them completely.

Use experts when you are planning for these tools. All of these methods require handling and safety precautions. Proper breathing filters, eye & skin protection, as well as disposable gowns/hazmat suits should be used when applications are performed and until the applications have dissipated to safe levels. Be careful not to co-mingle removed plant materials. Gloves become transport and infection spreaders after use.

Please also be sure to review your harvest testing requirements and what treatments are safe for your consumers and within legal limits. No one wants to have their harvest rejected due to pesticide contamination.

Figure 2: Municipal Water Treatment, RAIR Cannabis, Michigan

Clean-up after application may be required depending on the bioinsecticide or chemical that is used. Again, always ensure the safety of your employees and take precautions.

Start the application of your control options with your site map, room assignments and scout monitoring teams. Where does air flow into and within the facility? When your scouting team count logs go beyond your acceptable thresholds, here are some options for you.

Let’s begin with cleaning your irrigation and nutrient water sources. For a walk-through tutorial for incoming water treatment, humidity recovery and nutrient water recycling, please review the video tour of Water Treatment at RAIR Cannabis to see how an expert has done it.

From the IPM Planning Guide standpoint, peroxide and acid sterilizers can be used to clear irrigation water, for surface wipe-downs or as direct plant applications. We will cover those first. Caustic sterilizers require PPE for cleaning. Forgive my image here, we were just using water.

Concentrated Cleaners for Surfaces & Irrigation Sources (Hydrogen Peroxide & Sanitizers)

Plant interacting interfaces, i.e. surfaces, benches, walls, floors, trays, utensils, clippers, etc. should be sterilized with every use. Methods can include direct wipe-down or scrub, concentrated or diluted sprays or room vaporizers. A good example of hydrogen peroxide (H2O2) liquid would be a food grade sanitizer with 3-35% H2O2 content. Use acceptable diluted versions of these cleaners as appropriate.

Figure 3: Cleaning & Scrubbing, Where’s the PPE?

A commercial example would be Zerotol 2.0 with 27% H2O2 & their proprietary acid mix. Alternatively, you can use direct hydrogen peroxide generators from commercial sources to generate your H2O2 at various concentrations. More detailed examples are included in the complete Integrated Pest Management Guide (link at the end of this article). Establish your procedures for sterilizing your rooms and tools before you introduce plants, and describe what is to be done after every harvest and room turn. Track the cleaning materials used for your operational records. You will find this useful to track operational cost over time.

Sanitizing Acids for Surfaces & Irrigation Sources

Similar to hydrogen peroxide, hypochlorous acid (HOCl) comes in many commercial forms and can also be generated onsite using purchased generators. Commercial mix examples are UC Roots, Watermax and Athena Cleanse. They come in 0.028% to 15% concentrations. Self-generators range in output from highly precise 0.01% to 1% concentrations with more examples in the guide.

Treatment Tools

OK, so enough on cleaning preparation. Here are some tools that can be used to fight back against a pest intrusion:

Non-Chemical Microbial Biofungicide for Pathogens in Soil or Fertigation Water

Microbial fungicides are available to clear nutrient irrigation systems by minimizing pathogens and improving plant resistance to infections. Some fungicide versions target root pathogens by attacking the diseases directly. Others control or suppress common water carried challenges like pythium, rhizoctonia, phytophthora, fusarium and others. Brand names include Botanicare, Bonide, BioWorks, Actinovate, Mycostop and many more. Details covered in the guide.

Non-Chemical Microbial Bioinsecticides for Larval Stages

These biological tools attack the organisms or insects at a physical or mechanical way by breaking down the pest’s nervous system, biochemistry, or structural integrity (exoskeletons, etc.). These are engineered or living organisms (bugs to attack bugs) that are developed as targeted attacks for specific pests. Brand names are BioCeres, Botanigard, Venerate, Bio Solutions and others.

Minimal Risk Chemical Pesticides for Airborne Critters

Figure 3: Example Fungus Gnat Infestation – Royal Queen Seeds blog

Regularly approved for used in most locales, essential oils, natural acids (like citric acid) and insecticidal soap are commonly available in every hydroponic store. These work very well as safe spray “knock-down” insecticides for crawling or flying pests. Commercial examples use a proprietary mix of various oils, citric acids or isopropyl alcohol to do their task (examples in guide). Insecticidal soaps and fungicides for surface cleaning perform a similar purpose and typically use potassium salts or fatty acid mixtures.

Biochemical Pesticides

These tools are used to inhibit insect or fungal growth to acceptable levels. The multifaceted and commonly used neem oil comes in many commercial versions and is a naturally occurring pesticide extracted from the leaves and seeds of the neem tree. Example brand names are Bonide, Monterey, Triact and others. They range in concentrations from 0.9% to 70% concentrations. These oils suffocate living organisms or eliminate moisture to kill insects, spores or fungus at their initiation and throughout their lifespan.

Another option here are Azadirachtins. These act as insect growth regulators and disrupt the bugs natural evolution. Brand names are AzaGuard, AzaMax and others in the guide.

In summary, this week

We summarized some of the many pest control options available for water treatment, soil borne, intermediate or flying pests. We also covered various concentrations for these pesticide and sterilizer options. If you are not familiar with dilution ratios, %, PPM terms and how to apply the correct level of pesticide, you may find our plant science test kitchen blog on this topic of use here.

Chemical access and use should be restricted to employees familiar with their authorized application. PPE is very important to protect any employee that will come in contact with materials, liquids or vapors for chemical resources (gloves, boots, respirators, Tyvek (or equivalent protective wear) suits and eye protection or goggles.

For more detail on each of these treatments, you can see examples for your integrated pest management procedures in our complete white paper for Integrated Pest Management Recommendations, download the document here.

In our next chapter, Pest Population Control Actions, we will review control thresholds and example plans for a range of problems from biofilm build up to white flies and more. Our final chapter after that will suggest an emergency response framework and how to address pest outbreaks. See you next week.

Building An Integrated Pest Management Plan – Part 2

By Phil Gibson
No Comments

This is the second part of a series of articles designed to introduce an integrated pest management framework for cannabis cultivation facilities. To see Part One, click here. Part Three comes out next week and covers prioritization and preventative measures. Stay tuned for more!

This is Part 2: Pest Monitoring, Record Keeping, & Communications

Begin your pest identification process with a pest scouting document. You have already mapped out your facility with locations and potential access locations. For each of these pest types and room type assignments (mothers, clone, veg, flower), identify your employee scouts, their scouting methods, scouting frequency and the type of likely pest they are to search for and count.

Insect Types and Tracking Methods

Figure 1: Example Sticky Trap Scouting Map

Insect pest types include, but are not limited to, airborne flying or crawling insects, their various egg, lymph, larvae, pupal shells or immature forms. Look for trace remnants, plant damage or feces that let you know they are present in some form. If they are at the mature jumping or flying stage, this can be harder to count, but sticky traps distributed on an even basis around your rooms can make the counting process more consistent from survey to survey.

Note airflows in your rooms and fan locations so migrations can be predicted once an infestation is located.

Insects Can Be Everywhere – Crawlers & Fliers

Insects would like to be everywhere so they come in many types from the obvious flying and crawling types to root-zone microscopic, aquatic, fungal, bacterial or biofilm based. For those of you using soil or media, root-zone insects can be beneficial by digesting and breaking down organic matter into something useful for your plant’s roots (earthworms) or harmful by feeding directly on your plant roots and sucking the life out of your plants from out-of-sight below (nematodes, maggots).

Common pests in a cannabis environment include:

  • White flies – Oval shaped eggs on the underside of leaves, nymphs- oval crawlers that suck on the undersides of leaves, larger stage nymphs with pupae shells as they form wings and mature white flies.
  • Fungus gnats – Clear eggs deposited in overly wet soil or dead plant matter. Clear or white colored larvae in the soil or media, these worm-like critters go through multiple stages of molting as they grow, eventually pupating into brown cocoons and finally small black or dark flies with clear wings that flutter around your plants and suck on your leaves.
  • The dreaded spider mite – Clear, hard to see eggs on the underside of your leaves. These six-legged tiny moving bubbles begin the feeding as larva, add 2 legs in the intermediate and mature nymph stages and finally the oval shaped spider mites that every grower despises, adding their webs around the tops of your plants as their nurseries suck the life out of your flowers.

Insect Transfers of Bacterial Infections

Figure 2: The Dreaded Spider Mite

Many crawlers or fliers you may discover in your grow operation do not generate fungus or bacteria on their own. However, they do routinely pick these up along the feeding way and bring them into your shop. Sap-feeding insects like leafhoppers and aphids use their needle mouths to pierce your leaves to suck on the sap that is nourishing your greenery. These insects consume the fluids and transfer bacteria as they feed. Whiteflies fit into this category of leaf sucking bacteria carrying pests. These pests can make your healthy grow rooms look blotchy with color drained out of your canopy.

Obvious symptoms of these flying/hopping pests are sticky leaves, black fungus mold, or yellowing leaves that show up at the bottom of your plants and work their way upward as the infestation progresses. Leaf curling or plant wilting will be visible in the more advanced stages of these pests.

As if crawlers were not bad enough, invisible fungus and bacteria that get into your water supplies can be the worst challenges of any grow.

Water Sourced Bacteria

Baseline testing of your feed water is critical for any facility. This is true whether you are using surface water, well water or municipal water. Please see the water tutorials on the AEssenseGrows website for details on how to test your water sources and what to look for in the mineral content.

Regardless of your water source, bacteria can be present directly in your water supply, or it can be introduced from infected plant materials from one of your suppliers. Pythium, fusarium and the latest plague, hop latent viroid, are some of the most common threats that attack your plants from your water or soil sources. These can come from your wells, feed lines or plant materials.

Reverse osmosis (RO) is a typical method to clear water of most pathogens and bacteria using water that is pressed through filters with very small membrane apertures. These small openings usually stop impurities, salts and microorganisms. Of course, these systems come in many different types and they have to be maintained to keep their performance quality. Don’t take shortcuts on your RO system.

Once your water source is clean, strict hygiene procedures for tools, equipment and plumbing are the best way to minimize these threats to your plants downstream from your water source. These cleaning efforts are not a guarantee. Pests can still get into even the best facilities. Symptoms of these maladies vary, but root rot, stunted growth, wilting, discolored roots or leaves, and in some cases, the quick death of your plants is possible depending on the critter.

Use your scouting regimen and your data mapping to locate infestations before they expand and damage your facility. Isolate outbreaks and take appropriate measures to address the pests. We will give you suggestions on prioritization and preventative measures to take in the next chapter.

Figure 3: Example Pythium Brown Roots

Pythium is one of the most commonly harbored soil or water carried pests. When it is present and gets into your plants through cuts, natural openings, root surfaces or leaves on weakened plants, it can be devastating. In hydroponic systems, dirty looking brown roots evolve into full root rot if not addressed. Pythium is often the cause. In soil operations, pythium often shows up as wilting or yellowing patches on leaves.

Your lab testing partners are your friends when it comes to bacterial or fungal infections. Many diseases can resemble one another. It is not hard to misdiagnose environmental stress such as overheating or overwatering for a bacterial problem. Test results are necessary to accurately diagnose a problem.

Truly Airborne Molds & Mildews

Pythium and fusarium are not just present in water. They can also be airborne. Grey mold (botrytis) and powdery mildew are also common airborne pests. Proper humidity, air movement, air filtration and sterilization using HEPA (High-Efficiency Particulate Air) filters, activated carbon filters (also filter smells) and UV light sterilization can minimize these problems in your grow. Powdery mildew is the primary evil spore in this category. Airflow and regular cleaning to discourage fungal growth is the best way to limit these pests.

In conclusion, this week

Now that we have talked about identification (and clearly, this is not an exhaustive list), we will move into how to build in the cultural methods to prevent these problems from taking hold and ruining your business. In later chapters, we will dive into prioritization, treatment and control options for infestations, finally moving into control actions and emergency response.

Your integrated management response is how you pull all of this together and use your IPM procedures to increase your profitability. For the complete white paper on Integrated Pest Management Recommendations, download the document here.

Part three comes out next week and will delve into the world of Preventative Measures. Stay tuned for more!