Tag Archives: water

Building An Integrated Pest Management Plan – Part 4

By Phil Gibson
No Comments

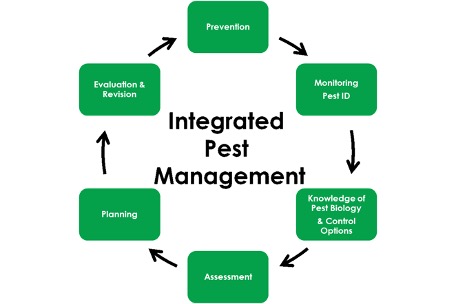
This is the fourth in a series of articles designed to introduce an integrated pest management framework for cannabis cultivation facilities. To see Part One, an overview of the plan and pest identification, click here. For Part Two, on pest monitoring and record keeping, click here. For Part Three, on preventative measures, click here. Part Five comes out next week on how to build a framework for control actions and how to monitor them. More to come!

This is Part 4: Direct Control Options

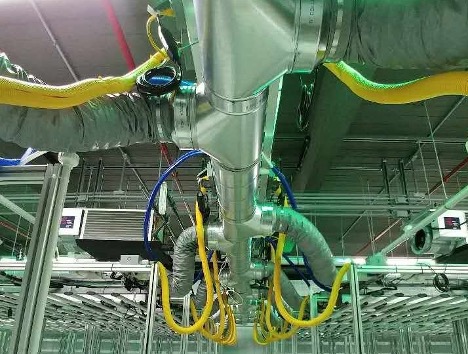
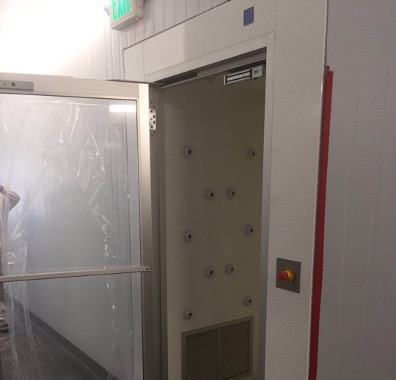
Even when the best methods are implemented and precautions are taken to protect your infrastructure, determined pests can penetrate your perimeter. Before you see crawling, hopping or flying insects, or sickly-looking plants, be sure to implement your physical protection (positive pressure airflow sealed facilities) and personal hygiene methods (shoe baths, sticky mats, & air shower entrances) to protect your crops. Equip your employees with personal protection equipment (PPE) proper gloves, masks and clothing as discussed in our last chapter, preventative measures.

Figure 1: Fungus Gnats Unleashed In A Grow Room

When things do break-out beyond your acceptable thresholds, Direct Control Options include non-chemical microbial biofungicides, microbial bioinsecticides and direct chemical control options. Lots of big scary words there, all of which are toxic even under safe application methods and when used at recommended concentrations levels. This means training in their use and protective clothing is required. Careful application of these control options is necessary so you exterminate your pests and not your people! This seems obvious, but do not just “wing it.”

These chemical elements can be applied in diluted concentration levels, manual wipe-down application, concentrated flush frequencies, or root drench applications, foliar spray mist applications, HVAC aerial diffusions and aerial knock-down sprays. You may even choose to remove badly infected plants and destroy them completely.

Use experts when you are planning for these tools. All of these methods require handling and safety precautions. Proper breathing filters, eye & skin protection, as well as disposable gowns/hazmat suits should be used when applications are performed and until the applications have dissipated to safe levels. Be careful not to co-mingle removed plant materials. Gloves become transport and infection spreaders after use.

Please also be sure to review your harvest testing requirements and what treatments are safe for your consumers and within legal limits. No one wants to have their harvest rejected due to pesticide contamination.

Figure 2: Municipal Water Treatment, RAIR Cannabis, Michigan

Clean-up after application may be required depending on the bioinsecticide or chemical that is used. Again, always ensure the safety of your employees and take precautions.

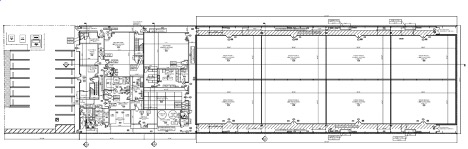
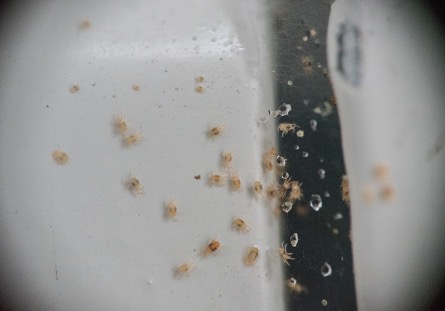
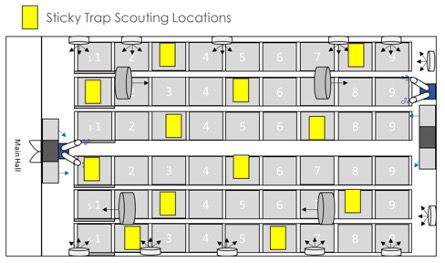
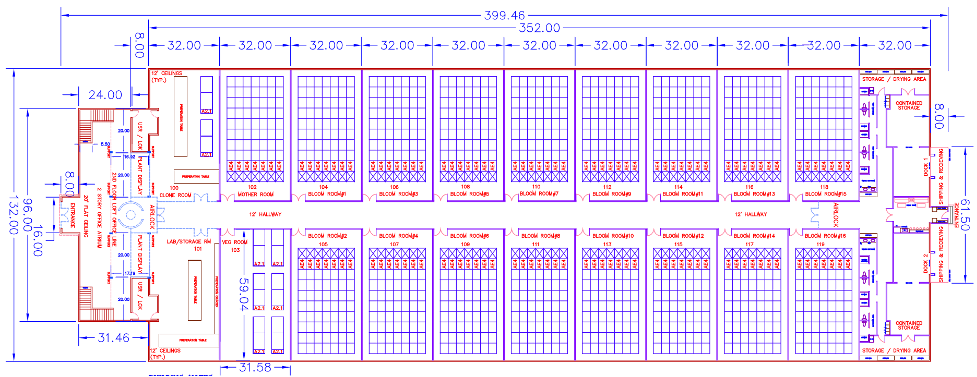
Start the application of your control options with your site map, room assignments and scout monitoring teams. Where does air flow into and within the facility? When your scouting team count logs go beyond your acceptable thresholds, here are some options for you.

Let’s begin with cleaning your irrigation and nutrient water sources. For a walk-through tutorial for incoming water treatment, humidity recovery and nutrient water recycling, please review the video tour of Water Treatment at RAIR Cannabis to see how an expert has done it.

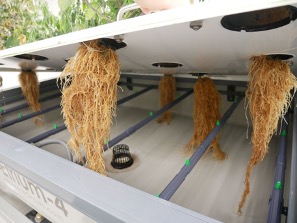
From the IPM Planning Guide standpoint, peroxide and acid sterilizers can be used to clear irrigation water, for surface wipe-downs or as direct plant applications. We will cover those first. Caustic sterilizers require PPE for cleaning. Forgive my image here, we were just using water.

Concentrated Cleaners for Surfaces & Irrigation Sources (Hydrogen Peroxide & Sanitizers)

Plant interacting interfaces, i.e. surfaces, benches, walls, floors, trays, utensils, clippers, etc. should be sterilized with every use. Methods can include direct wipe-down or scrub, concentrated or diluted sprays or room vaporizers. A good example of hydrogen peroxide (H2O2) liquid would be a food grade sanitizer with 3-35% H2O2 content. Use acceptable diluted versions of these cleaners as appropriate.

Figure 3: Cleaning & Scrubbing, Where’s the PPE?

A commercial example would be Zerotol 2.0 with 27% H2O2 & their proprietary acid mix. Alternatively, you can use direct hydrogen peroxide generators from commercial sources to generate your H2O2 at various concentrations. More detailed examples are included in the complete Integrated Pest Management Guide (link at the end of this article). Establish your procedures for sterilizing your rooms and tools before you introduce plants, and describe what is to be done after every harvest and room turn. Track the cleaning materials used for your operational records. You will find this useful to track operational cost over time.

Sanitizing Acids for Surfaces & Irrigation Sources

Similar to hydrogen peroxide, hypochlorous acid (HOCl) comes in many commercial forms and can also be generated onsite using purchased generators. Commercial mix examples are UC Roots, Watermax and Athena Cleanse. They come in 0.028% to 15% concentrations. Self-generators range in output from highly precise 0.01% to 1% concentrations with more examples in the guide.

Treatment Tools

OK, so enough on cleaning preparation. Here are some tools that can be used to fight back against a pest intrusion:

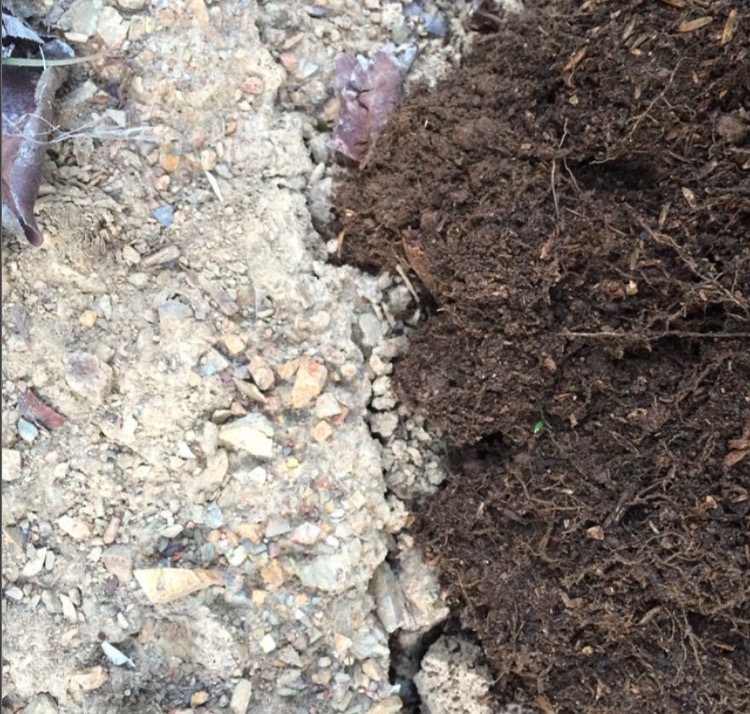
Non-Chemical Microbial Biofungicide for Pathogens in Soil or Fertigation Water

Microbial fungicides are available to clear nutrient irrigation systems by minimizing pathogens and improving plant resistance to infections. Some fungicide versions target root pathogens by attacking the diseases directly. Others control or suppress common water carried challenges like pythium, rhizoctonia, phytophthora, fusarium and others. Brand names include Botanicare, Bonide, BioWorks, Actinovate, Mycostop and many more. Details covered in the guide.

Non-Chemical Microbial Bioinsecticides for Larval Stages

These biological tools attack the organisms or insects at a physical or mechanical way by breaking down the pest’s nervous system, biochemistry, or structural integrity (exoskeletons, etc.). These are engineered or living organisms (bugs to attack bugs) that are developed as targeted attacks for specific pests. Brand names are BioCeres, Botanigard, Venerate, Bio Solutions and others.

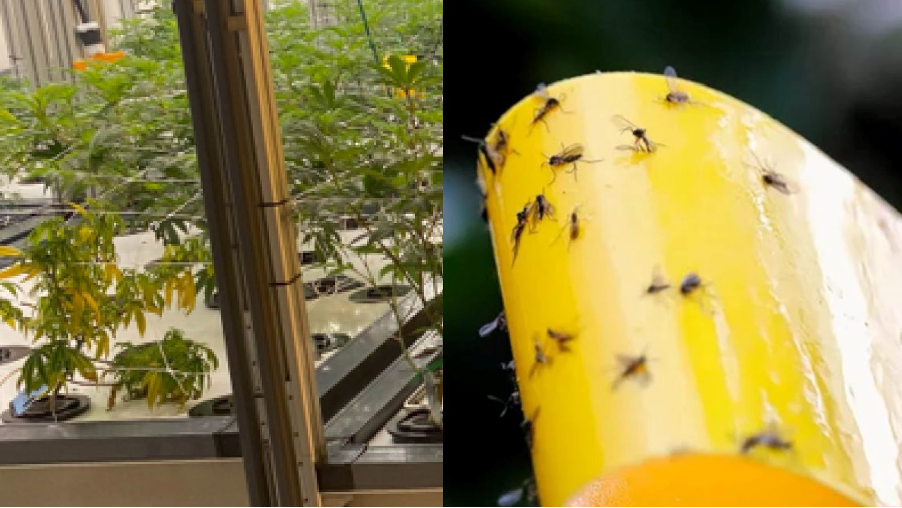
Minimal Risk Chemical Pesticides for Airborne Critters

Figure 3: Example Fungus Gnat Infestation – Royal Queen Seeds blog

Regularly approved for used in most locales, essential oils, natural acids (like citric acid) and insecticidal soap are commonly available in every hydroponic store. These work very well as safe spray “knock-down” insecticides for crawling or flying pests. Commercial examples use a proprietary mix of various oils, citric acids or isopropyl alcohol to do their task (examples in guide). Insecticidal soaps and fungicides for surface cleaning perform a similar purpose and typically use potassium salts or fatty acid mixtures.

Biochemical Pesticides

These tools are used to inhibit insect or fungal growth to acceptable levels. The multifaceted and commonly used neem oil comes in many commercial versions and is a naturally occurring pesticide extracted from the leaves and seeds of the neem tree. Example brand names are Bonide, Monterey, Triact and others. They range in concentrations from 0.9% to 70% concentrations. These oils suffocate living organisms or eliminate moisture to kill insects, spores or fungus at their initiation and throughout their lifespan.

Another option here are Azadirachtins. These act as insect growth regulators and disrupt the bugs natural evolution. Brand names are AzaGuard, AzaMax and others in the guide.

In summary, this week

We summarized some of the many pest control options available for water treatment, soil borne, intermediate or flying pests. We also covered various concentrations for these pesticide and sterilizer options. If you are not familiar with dilution ratios, %, PPM terms and how to apply the correct level of pesticide, you may find our plant science test kitchen blog on this topic of use here.

Chemical access and use should be restricted to employees familiar with their authorized application. PPE is very important to protect any employee that will come in contact with materials, liquids or vapors for chemical resources (gloves, boots, respirators, Tyvek (or equivalent protective wear) suits and eye protection or goggles.

For more detail on each of these treatments, you can see examples for your integrated pest management procedures in our complete white paper for Integrated Pest Management Recommendations, download the document here.

In our next chapter, Pest Population Control Actions, we will review control thresholds and example plans for a range of problems from biofilm build up to white flies and more. Our final chapter after that will suggest an emergency response framework and how to address pest outbreaks. See you next week.

Building An Integrated Pest Management Plan – Part 3

By Phil Gibson
No Comments

This is the third in a series of articles designed to introduce an integrated pest management framework for cannabis cultivation facilities. To see Part One, click here. For Part Two, click here. Part Four comes out next week and covers direct control options for pest reduction. More to come!

This is Part 3: Preventive Measures

Preventive measures are a great investment in the profitability of your operations. Our objective is to ensure successful repeat harvests forever. Build your procedures with this in mind. This means maintenance and regular review. We all realize that this work can be monotonous drudgery (we know!), but these procedures will ensure your success.

Figure 1: New Air Shower Access Installation

As a summary to begin, pest access must be limited wherever possible. Employees are the first place to start, but we must also return to our site map and review our facility design and workflows. Every operation has to move plants from nursery through harvest and post-harvest. Where should cleaning happen? Of course, you have to clean up post-harvest but when should this occur during the grow cycle? What is the best way to monitor and clean environmental management systems (i.e. air, water) and what are the weaknesses in the physical barriers between operations? Let’s walk through these issues one-by-one.

Employee Access and Sterile Equipment

Follow procedures to screen and protect your employees both to eliminate pests and to avoid exposing your employees to harmful chemicals or storage areas. Look for ways to isolate your workflow from pest access. Be certain that your facility is airtight and sealed with filtration of molds, spores and live organisms in your air intake areas. Air showers at your access points are important to screen your employees on their way into your gowning areas and grow facility. Clothing should be standardized and shoe coverings or crocs should be provided for all employees that access your interior. Look for ways to stop all pests (embedded, crawling, hopping or flying) in all of your room assignments (mothers, clone, veg, flower, trim and drying). This can be improved with shoe baths, sticky mats, frequent hygiene (hand washing and cleaning stations) and procedures for entry.

Always consider requiring hair & beard nets, shoe covers and disposable gloves in plant sensitive areas.

Chemical Access & Protective Equipment

Figure 2: Example Facility Map – Understand Workflow & Barriers to Pest Access

Personal protection equipment (PPE) is very important to protect any employee that will come in contact with materials, liquids or vapors for chemical resources. Establish procedures for chemical use and train employees in the safe handling of these materials. Typical equipment includes high density chemical protective gloves, boots, respirators, Tyvek (or equivalent protective wear) suits and eye protection or goggles.

Chemical access areas and their use should be restricted to employees familiar with their authorized application. Always remember that cannabis is an accumulator plant, and it will absorb and hold onto chemical treatments. Appropriate isolation and safety procedures must be followed for chemical use. Not following these restrictions can expose your employees to dangerous chemicals or get your entire harvests rejected at testing.

Facility Map & Workflow

Because insects would like to be everywhere and they come in many types (root zone, crawling, flying, microscopic, bacterial or biofilm), the facility workflow must understand where they are and how they might migrate if they penetrate your defenses. Note airflows in your rooms and fan locations so migrations can be predicted once an infestation is located. Where are your opportunities for full clean-up and disaster recovery in your building? Where should you stage maintenance filters, test kits, water and cleaning materials. How best to clean up and dispose of sealed garbage containers or cleaning materials?

Operational Cleaning & Post-Harvest Reset

When compiling your preventative measure documents, it is critical to create a repeatable operating procedure for cleaning and sanitizing your rooms, systems, and growing spaces after each harvest. Plant material handling, cleaning surfaces and wipe methods should all be documented in your Standard Operating Procedures (SOPs). Define what “clean” is. Removing plants and plant debris is pretty clear but define how to drain reservoirs, clean pipes, change filters and clean and sterilize your rooms. Operators must be trained in these SOPs and reminded of their content on a regular schedule. This is how you avoid outbreaks that can crush your profits.

Physical Barriers & Maintenance

Figure 3: HVAC Air Filtration, Dehumidification, & Air Movement, Onyx Agronomics

Document your sealed spaces and define your normal room and access door barrier interfaces. Review the status of any known cracks or gaps in your perimeter. Are there any known leaks or piping that has been seen as a risk or a problem in the past? Are there any discoloring or resident mold locations (Never happens, right?). Baseline how much time and people resource a harvest operation and cleaning effort should take. Will you do this after every harvest or compromise your risk by delaying to every third or fourth harvest? Create your barrier SOP.

Environmental Control & HVAC

Managing the air quality provided to your plants is critical to your yields. Controlling CO2, air movement rates (the leaf happy dance), humidity, air filtration and sterilization methods must be maintained and cleaned on a regular basis. Do you need to change the HEPA or other particulate filters? Is there any UV light sterilization maintenance? We have all seen the home HVAC air conduit cleaning commercials. Your commercial facility is no different. How will you clean your air and water plumbing systems? How often will you perform this full reset? When will you calibrate and data log your sensors for temperature, humidity, CO2 and water resources? Put everything about your environmental set points into your maintenance document and decide when to validate these. Molds, mildews and biofilm hazards are all waiting for unmonitored systems to open the door for access.

In Conclusion, This Week

If you’re an IPM nerd and this dynamic topic did not put you to sleep, you can read more detail and examples for your integrated pest management procedures in ourcomplete white paper for Integrated Pest Management Recommendations, download the document here.

In our next chapter, Direct Control Options, we will review what you can use to protect or recover control of your facility including both chemical and non-chemical tools and methods. In our final two chapters, we will discuss extermination of the determined pests that breach your defenses. And with great expectations, our final chapter will discuss emergency response and time to go to war!

Part Four comes out next week. See you again soon!

Building An Integrated Pest Management Plan – Part 2

By Phil Gibson
No Comments

This is the second part of a series of articles designed to introduce an integrated pest management framework for cannabis cultivation facilities. To see Part One, click here. Part Three comes out next week and covers prioritization and preventative measures. Stay tuned for more!

This is Part 2: Pest Monitoring, Record Keeping, & Communications

Begin your pest identification process with a pest scouting document. You have already mapped out your facility with locations and potential access locations. For each of these pest types and room type assignments (mothers, clone, veg, flower), identify your employee scouts, their scouting methods, scouting frequency and the type of likely pest they are to search for and count.

Insect Types and Tracking Methods

Figure 1: Example Sticky Trap Scouting Map

Insect pest types include, but are not limited to, airborne flying or crawling insects, their various egg, lymph, larvae, pupal shells or immature forms. Look for trace remnants, plant damage or feces that let you know they are present in some form. If they are at the mature jumping or flying stage, this can be harder to count, but sticky traps distributed on an even basis around your rooms can make the counting process more consistent from survey to survey.

Note airflows in your rooms and fan locations so migrations can be predicted once an infestation is located.

Insects Can Be Everywhere – Crawlers & Fliers

Insects would like to be everywhere so they come in many types from the obvious flying and crawling types to root-zone microscopic, aquatic, fungal, bacterial or biofilm based. For those of you using soil or media, root-zone insects can be beneficial by digesting and breaking down organic matter into something useful for your plant’s roots (earthworms) or harmful by feeding directly on your plant roots and sucking the life out of your plants from out-of-sight below (nematodes, maggots).

Common pests in a cannabis environment include:

  • White flies – Oval shaped eggs on the underside of leaves, nymphs- oval crawlers that suck on the undersides of leaves, larger stage nymphs with pupae shells as they form wings and mature white flies.
  • Fungus gnats – Clear eggs deposited in overly wet soil or dead plant matter. Clear or white colored larvae in the soil or media, these worm-like critters go through multiple stages of molting as they grow, eventually pupating into brown cocoons and finally small black or dark flies with clear wings that flutter around your plants and suck on your leaves.
  • The dreaded spider mite – Clear, hard to see eggs on the underside of your leaves. These six-legged tiny moving bubbles begin the feeding as larva, add 2 legs in the intermediate and mature nymph stages and finally the oval shaped spider mites that every grower despises, adding their webs around the tops of your plants as their nurseries suck the life out of your flowers.

Insect Transfers of Bacterial Infections

Figure 2: The Dreaded Spider Mite

Many crawlers or fliers you may discover in your grow operation do not generate fungus or bacteria on their own. However, they do routinely pick these up along the feeding way and bring them into your shop. Sap-feeding insects like leafhoppers and aphids use their needle mouths to pierce your leaves to suck on the sap that is nourishing your greenery. These insects consume the fluids and transfer bacteria as they feed. Whiteflies fit into this category of leaf sucking bacteria carrying pests. These pests can make your healthy grow rooms look blotchy with color drained out of your canopy.

Obvious symptoms of these flying/hopping pests are sticky leaves, black fungus mold, or yellowing leaves that show up at the bottom of your plants and work their way upward as the infestation progresses. Leaf curling or plant wilting will be visible in the more advanced stages of these pests.

As if crawlers were not bad enough, invisible fungus and bacteria that get into your water supplies can be the worst challenges of any grow.

Water Sourced Bacteria

Baseline testing of your feed water is critical for any facility. This is true whether you are using surface water, well water or municipal water. Please see the water tutorials on the AEssenseGrows website for details on how to test your water sources and what to look for in the mineral content.

Regardless of your water source, bacteria can be present directly in your water supply, or it can be introduced from infected plant materials from one of your suppliers. Pythium, fusarium and the latest plague, hop latent viroid, are some of the most common threats that attack your plants from your water or soil sources. These can come from your wells, feed lines or plant materials.

Reverse osmosis (RO) is a typical method to clear water of most pathogens and bacteria using water that is pressed through filters with very small membrane apertures. These small openings usually stop impurities, salts and microorganisms. Of course, these systems come in many different types and they have to be maintained to keep their performance quality. Don’t take shortcuts on your RO system.

Once your water source is clean, strict hygiene procedures for tools, equipment and plumbing are the best way to minimize these threats to your plants downstream from your water source. These cleaning efforts are not a guarantee. Pests can still get into even the best facilities. Symptoms of these maladies vary, but root rot, stunted growth, wilting, discolored roots or leaves, and in some cases, the quick death of your plants is possible depending on the critter.

Use your scouting regimen and your data mapping to locate infestations before they expand and damage your facility. Isolate outbreaks and take appropriate measures to address the pests. We will give you suggestions on prioritization and preventative measures to take in the next chapter.

Figure 3: Example Pythium Brown Roots

Pythium is one of the most commonly harbored soil or water carried pests. When it is present and gets into your plants through cuts, natural openings, root surfaces or leaves on weakened plants, it can be devastating. In hydroponic systems, dirty looking brown roots evolve into full root rot if not addressed. Pythium is often the cause. In soil operations, pythium often shows up as wilting or yellowing patches on leaves.

Your lab testing partners are your friends when it comes to bacterial or fungal infections. Many diseases can resemble one another. It is not hard to misdiagnose environmental stress such as overheating or overwatering for a bacterial problem. Test results are necessary to accurately diagnose a problem.

Truly Airborne Molds & Mildews

Pythium and fusarium are not just present in water. They can also be airborne. Grey mold (botrytis) and powdery mildew are also common airborne pests. Proper humidity, air movement, air filtration and sterilization using HEPA (High-Efficiency Particulate Air) filters, activated carbon filters (also filter smells) and UV light sterilization can minimize these problems in your grow. Powdery mildew is the primary evil spore in this category. Airflow and regular cleaning to discourage fungal growth is the best way to limit these pests.

In conclusion, this week

Now that we have talked about identification (and clearly, this is not an exhaustive list), we will move into how to build in the cultural methods to prevent these problems from taking hold and ruining your business. In later chapters, we will dive into prioritization, treatment and control options for infestations, finally moving into control actions and emergency response.

Your integrated management response is how you pull all of this together and use your IPM procedures to increase your profitability. For the complete white paper on Integrated Pest Management Recommendations, download the document here.

Part three comes out next week and will delve into the world of Preventative Measures. Stay tuned for more!

Building An Integrated Pest Management Plan – Part 1

By Phil Gibson
No Comments

This is the first part of a series of articles designed to introduce an integrated pest management framework for cannabis cultivation facilities. Part one details an overview of the plan as well as pest identification. Part two comes out next week and will delve into the world of pest monitoring and record keeping. Stay tuned for more!

Figure 1: Integrated Pest Management Cycle

Background

Integrated Pest Management (IPM) is a philosophy of pest prevention and control that integrates cultural, mechanical, physical and chemical practices to control pest populations within an acceptable degree of economic tolerance.

IPM encourages growers to take a step-wise approach to determine the most appropriate means necessary for avoiding pest-related economic injury through careful consideration of all available pest control practices.

When practicing IPM, less invasive non-chemical practices are given priority, until escalation necessitates otherwise.

This is Part 1: Pest Identification & Monitoring/Communications

Personal experience in a facility is a great place to start. Review your history and identify a list of pests that you have experienced in this or previous grows. Point out which pests currently exist where they were or are currently and possible sources of the contamination/infestation.

Figure 2: Healthy Aeroponic Mother Stock

Map out your facility with clear entry/exits, plumbing & drainage and air flow access to visually see and understand potential access points for crawling, flying or airborne pests.

From your nursery mother room to cloning and vegetation areas, what are the transfer methods as you move from one area to another. Are pests present in these areas? Where could they have come from? Oftentimes, a cultivator may not have the space for their own mother and cuttings/cloning space. In these cases, where did the outsourced clones come from? What are the IPM controls in place for these genetic sources? Are they carriers of the challenges transferred to your own facility? It is important to identify the possible source of pest potentials

Does your flower room have white flies or fungus gnats? Locating these and identifying the likely source is a good place to start if you have an ongoing infestation.

Figure 3: Example Aeroponic Facility Layout For IPM Planning

Powdery mildew is a routine challenge if air into your facility is not filtered and sterilized to eliminate these spores.

What is the Source of Your Irrigation/Fertigation Water?

Water is a crucial element for high-value indoor farms such as those that grow cannabis. However, water can also be a source of disease-causing microorganisms that can negatively impact the growth and yield of crops. Monitoring, filtering and sterilizing the biological contents of water is therefore crucial in ensuring the health and quality of high-value crops.

Unfiltered water can contain a range of pathogens such as bacteria, viruses, fungi and parasites that can cause root, stem and bud rot. These diseases can cause significant losses in crop yield and quality, which can be devastating for indoor farmers growing high-value crops.

Figure 4: Precision Aeroponics at FarmaGrowers GMP Facility, South Africa

Monitoring the quality of water that is brought into the indoor farm is the first step in ensuring that the water is free from harmful pathogens. This involves regular testing of the incoming water for parameters such as pH, dissolved oxygen, TDS, nutrient content and microbial load. This allows cultivators to identify aspects of the incoming water they need to address before the water is provided to their crops to prevent potential problems.

Is your plumbing building biofilm that is feeding into your irrigation lines? Obviously, there are many potential sources when you go through an inventory of the risks for your facility. From that initial step, you will build your management team and label who should be contacted when a pest is found. Do you have an IPM specialist or is this a resource that needs to be contracted to address an infection?

Building this communications tree is your first step to fewer pest issues and higher yields and potency.

For the complete white paper on Integrated Pest Management Recommendations, download the document here. Part two comes out next week and will delve into the world of pest monitoring and record keeping. Stay tuned for more!

Addressing Cannabis Price Compression With Science

By Mark Doherty
1 Comment

Cannabis cultivators across the U.S. are confronting plummeting wholesale prices and tighter profit margins. Operators in Pennsylvania say flower prices have fallen from around $4,000 a pound to around $3,000, on average, and prices in the more mature markets of California, Oregon and Colorado have experienced extreme volatility. Prices in those states are averaging around $700 per pound but of course, that’s an average. There are whispers that prices are as low as $150, revealing how bad the situation really is.

Oversaturation of legal cannabis affects commercial growers everywhere. For example, when Oklahoma opened its free-wheeling medical cannabis program with unlimited business licenses, the pipeline of cannabis from legacy markets in California was disrupted and a glut of flower from the gray market began to influence pricing within the state’s legal market. Although cannabis is not federally legal and interstate commerce is banned, what happens in one state definitely affects what happens in another.

Competition in legal markets has also increased dramatically in recent years as multistate operators expand their footprint and consolidation proliferates. Vertically integrated cultivation, manufacturing and retail is becoming unsustainable for many mom-and-pop businesses, while MSOs can leverage their cash and resources to weather the current storm.

Economic Viability Meets High Quality Production

All of this news is not necessarily negative, but it’s a definite cautionary tale: Being complacent opens opportunities for others. Growing cannabis is complex. It is working with a living and breathing machine. Some businesses fail because operators are not able to find the perfect blend of horticulture, plant science and manufacturing efficiency necessary for success. Some see it simply as a manufacturing concern, others a scientific endeavor, and still others as an artform. An understanding of growing cannabis as a blend of all three is paramount.

Just like the LED evolution, other new cultivation technology is here to stay and should not be brushed off as just experimental

Squeezing more high-quality product out of existing facilities is essential. Costs for labor and electricity are relatively fixed, so operators must turn to technology to improve yield, quality, consistency and plant health without increasing operating expenses.

Over the years, growers have often resisted change surrounding what they view as “the way” or “the best,” but with the industry in such distress, the time is now to address facility inefficiencies.

Much like the evolution of LED use, there might be an initial skepticism at the cost and real value of new cultivation technology, but the economics are too compelling to ignore. The majority of all indoor grows now use LED. The progression from single-ended bulbs, to double-ended HPS, to LED is analogous to plants on the floor of a grow facility, to rolltop benches, and now to vertical farming using racks.

Vertical Cultivation Science

Crop steering applies plant science directly to commercial production. The methodology is based on the idea that plants can be manipulated to grow and perform a certain way. For cannabis plants, the science really comes into play with inter-canopy airflow.

When airflow occurs under the surface of the leaf of the plant, the stomata opens and gas exchange increases as water vapor and oxygen are released and carbon dioxide is absorbed. The micro-barrier of air trapped against the leaves is broken and the exchange of gasses and energy in the cultivation environment is improved, enabling the entire grow to increase its yield. And while CO2 supplementation is widely used and has been for years with positive effect, the under-canopy airflow provides greater efficiency relative to the operating expense of pumping CO2 into the grow room. Money can be saved by applying science to encourage the plant to uptake the extra CO2 that has been naturally released.

Proper Drainage Is Also Key

Controlling the space with proper drainage will keep a host of problems at bay

Drainage issues like the puddling of water in vertical farming are detrimental to the efficiency of a cultivation facility. Even when growers use precision irrigation techniques to give the plants pinpointed irrigation volumes over different time periods, rack systems can still suffer from drainage issues. That means that affected plants are not receiving the precision irrigation strategy and the entire purpose of the scientific application is defeated.

Precise drainage is critical because standing water opens the door to root born disease, pests, and microbial issues. Spray regimes can address this problem, but they cost money. The key is to reduce dependency on mitigation efforts by better controlling the agricultural space and improving outcomes with a scientifically approached plan.

Greenhouses, warehouses and vertical farming facilities all have potential environmental issues that reduce their economic viability, but with proper vertical air movement, drainage equipment and an understanding of microclimates and how to address them scientifically, efficiency and product quality are enhanced.

Time to Embrace Change

As with any industry, there is resistance to adopting new technology in cannabis cultivation. The original and legacy players will always claim they know how to best grow their plants, but the reality is that the business needs must be addressed.

As canopies increase within a facility, advancements like robotics, LEDs and advanced airflow technology define how the industry operates and continues to improve. Efficiency keeps business alive—cannabis growers must continually assess their operations and make the capital investments that will pay off as wholesale prices continue to decline.

The 3-Legged Stool of Successful Grow Operations: Climate, Cultivation & Genetics – Part 3

By Phil Gibson
No Comments

This is Part 3 in The 3-Legged Stool of Successful Grow Operations series. Click here to see Part 1 and here to see Part 2. Stay tuned for Part 4, coming next week.

The Right Build Out

Aeroponic & hydroponic systems grow plants at a highly accelerated rate. A “clean room” type of construction approach is the best way to manage this type of grow operation. Starting with a facility that is completely void of any kind of wood or materials that are porous is a good start. Cellulose materials collect moisture and encourage mold and mildew formation no matter how good the sealant.

We have seen cultivation spaces built out of dry wall over wooden post construction and studs that look sealed and solid on the outside of walls but when repaired for plumbing or other expansion work, they are black inside and covered with nasty mold that no one wants near their grow space.

Panel construction over steel frames or steel studs with skins is a safer, more sterile approach than retrofitting a wooden structure. Panel construction offers the added benefit of rapid assembly and minimal labor costs. We have seen 300 light rooms assembled in a few days so it is both very cost effective and safely sealed for protected growth.

Room Sizes & Count

How do you best fill this space if you have a clean slate?

If you have unlimited space, temperature and humidity management should determine the room sizes in your facility. Room sizes that are square in dimensions tend to be easier to maintain from an environmental standpoint. Long narrow rooms are good for fan airflow but tend to be more expensive from a cooling and dehumidification point of view. The larger the room, the more likely that you will get “microclimates” within the room which can challenge yield optimization.

Now, of course, many grows are retrofits of existing structures so compromises can be necessary. We have found that cultivators that have both very large and mid-size rooms in the same facility (200 lights versus 70 lights) are consistently more successful in the 70 light rooms. These “smaller rooms (~1,500 ft2) out-yielded and out-performed the larger rooms using the same genetics and grow plans. Compartmentalization also minimizes the risk in the case that a calamity (i.e. pest infestation) strikes the room. In a large room scenario, the losses can damage your operation. For this reason, we recommend 70-100 light/tub rooms as a standard.

Rooms should also follow your nursery economics. Structuring your nursery to produce just enough clones/veg plants for your next flower room avoids wasted plant material and resources. Breaking a larger space down into individual rooms means that you need fewer veg plants to fill your flower room that week. The best way to optimize this is to have a number of rooms that are symmetrical with the number 8 (typical 8-week cycle genetics).

With 8 rooms running flower, you are able to plant one room per week for 8 weeks. In the 9th week, you start over on room 1. This continuous harvest process is highly efficient from a labor standpoint and it minimizes the size of your mothers room (cost center). Additional space can be applied to your flower rooms. If you do not have infinite space, even divisors work just as well; 2 or 4 rooms can be planted in sequence for the same optimization (for 2-room structures, harvest and replant 1 room every 4 weeks for example). The optimal structure (8, 16, 24, or more rooms) enables you to optimize your profitability. If any of this needs further explanation, please just ask.

Not photoshopped: An “ideal” 70-tub flower room in a CEA greenhouse (courtesy of FarmaGrowers, South Africa)

Within your room choice, movable rows or columns of tubs/lights also provides optimal yields.  Tubs/plants can be moved together for light usage efficiency and one 3-foot aisle can be opened for plant maintenance. Racking systems or movable trays/tubs make this convenient nowadays.

Floors

Concrete floors offer pockets for bacteria to collect and smolder.  As such, they have to be sealed.  Proper application of your sealant choice is required so that it does not peal up or crack after sealing. There are many benefits to sealed floors that is discussed in the white paper. Floor drains are the equivalent of a portal to Hell for a sterile grow operation. Avoid them at all costs.

Phased Construction

Tuning or optimizing you grow rooms for ideal flowering operation depends on your location. Our advice is that you build and optimize your facility in phases with the expectation that nothing is perfect and you will learn improvements in every phase of expansion. The immediate benefit is production that you can promote to your sales channels and revenue that starts as soon as possible to improve your profitability. This is also an excellent learning curve to apply to subsequent rooms. Our happiest customers are those that learned construction improvements in early rooms that were able to be applied to following rooms without headache. The ability to focus on one or two rooms also allows you to get the recipe correct rather than just relying on “winging it”.

Don’t Be In A Rush To Go Green

A 70-tub flower room (courtesy of FarmaGrowers, South Africa)

Validate your water supplies and their stability. Verify that the water in your aeroponic or hydroponic feeds that get to your plants are clean and sterile. This is much easier in a step-by-step fashion than in a crisis debug mode once production is in progress. Be very cautious about incoming clone supplies. We will talk about this more in the next chapter on Integrated Pest Management but incoming clones are a top pest vector that can contaminate your entire facility.

Warehouse Versus Greenhouse Cultivation Spaces

As we started out, controlling your environment is your most important concern. We have seen success in both indoor rooms and greenhouses. The defining success factor is controlling humidity and temperature. Modern sealed controlled environment (CEA) greenhouses do this well and CEA is somewhat of a given for indoor grows. More details on this in the white paper.

Packaging these recommendations gets you to the perfect body for your Formula 1 race car. Now, you are ready to look at some of the mechanics of protecting your operation from pesky little critters and biologicals that can derail your operation and weaken your engine.

Before we sign off this week, I wanted to highlight the ultimate build-out that we have seen so far.  Of course, there are many challengers that have done this well but at this point, FarmaGrowers in South Africa has the best thought out facility we have seen. They acquired Good Manufacturing Practice (GMP) & Good Agricultural & Collection Practice (GACP) certification early in their operations due to very well-thought-out designs. They are exporting to global markets without irradiation today. Certainly, many successful customers have beautifully thought-out operations and there are several upcoming facilities that offer amazing planning that will challenge for this crown, but for now. FarmaGrowers leads the pack in this aspect. See here for a walkthrough.

To download the complete guide and get to the beef quickly, please request the complete white paper Top Quality Cultivation Facilities here.

Stay tuned for Part 4 coming next week where we’ll discuss Integrated Pest Management.

The 3-Legged Stool of Successful Grow Operations: Climate, Cultivation & Genetics – Part 2

By Phil Gibson
No Comments

This is Part 2 in The 3-Legged Stool of Successful Grow Operations series. Click here to read Part 1 and stay tuned for Part 3 coming next week.

Aeroponic and hydroponic systems use zero-soil, so water is effectively our media and our transport mechanism for nutrition. Ideally, you start with clean, fresh water with “nothing” in it. Nothing in this case means no heavy metals, pesticides, bacteria or pathogens. There are some scary words in there so let’s talk through the best ways to get to “nothing.”

The first place to start is by testing your source water, whether it is surface, well or municipal water. This will give you an initial idea of how “empty” your water is. Water supplies shift over time, so it is also a very important input to monitor over time with annual or bi-annual testing. Clean water is the essence of success for aeroponics and a great way to lower your cost of production. With proper design and management, you can recycle and reuse 95%+ of the water you draw into your facility.

Reverse Osmosis (RO)

Mothers to clones: Happy clones, it’s all about the water

RO is the most common way to clear your incoming water. The process uses pressure filtration by forcing your water through a series of filters or meshes that block or extract large particles, organics and metals. Normally this is 98%-99% efficient. These systems do require attention and maintenance as they do have filters that are required to be changed regularly depending on the clarity of your original water source and the type of material filtered. This accomplishes a lot of your water clearing process to empty the balloon, but it does not clear the pesky biologicals or pathogens. RO is covered in detail in our “You are what you drink” webinar so look that over for a deeper explanation. There are a wide range of relatively low-cost suppliers based on capacity and filtration efficiency. From an operations standpoint, the key is to understand the filter replacement cycle and cost of replacement.

Ultraviolet Light (UV)

UV light can be used to clear organics and pathogens from water. The primary use is to clear origin water but it is also especially important for recovered water that you save from the humidity in your grow rooms. More on this below. One has to be cautious about the use of UV light. It will cause sunburn and eye damage with exposure so handle this resource with care. After RO & UV treatment, input water should be an empty balloon ready for the addition of your perfect nutrient salt recipe. There are a wide range of low-cost UV lighting solution suppliers from which to choose and they are easy to find.

Dehumidification & Recovery (DEHU)

Early root follicles: Reaching for first nutrients

The number one way to conserve water in an accelerated growth aeroponic grow room is to recapture the humidity that is transpired into the air as the plants grow. While DEHU water is effectively distilled water (or clear of particulates), it can be full of healthy little bacteria or pathogens than may be transported through air or residing in the equipment filters. Clearing these with UV light normally makes this water directly reusable in your fertigation systems. Not all dehumidifiers are perfect. Some metals used in their construction can leach into the recovered water, so this is worth a deeper look as you create your complete water system. Air treatment suppliers are covered in Part 1 of this series.

Used Fertigation Water, or “Flush”

At the start of the flower cycle, take your clean water (the empty balloon) and add your perfect nutrient salt flower recipe and deliver it to your plants. Over the grow cycle from flower to harvest, your plants will use portions of your nutrients and your balloon contents will drift from your target recipe you’re your desired cycle, clear or flush your reservoirs and reset your recipe by refilling your balloon to your exact targets. The exiting nutrient-rich “flush” water can also be recycled into your source water feed since the salts and metals present can be cleared from the mixture through the same RO process that your source water goes through. The end result is perfectly good recycled water savings.

Oxygen Reduction Potential (ORP)

Healthy roots reach for water: Early veg when plants get rolling

ORP is a measurement of an oxidizing agent. Oxidizing solutions are a common and inexpensive method of disinfecting water before and during use in hydroponic systems. Oxidizers can be used to monitor and deal with the “cleanliness” of a nutrient water solution while it is in use. Several oxidizing agents exist with the most common being: hydrogen peroxide, chlorine, ozone and chlorine dioxide. The characteristics of each of these agents and how they interact with the organic matter in solutions is different. The ideal concentrations to use in each situation to kill or control pathogens is unique and one of the topics covered by our “Letters from the AEssenseGrows plant science team” on our website. That deep dive is the subject of another paper.

When you take all of these subjects together and they are done right, you should be able to recycle 95% of your source water with a professional water treatment & recycling system.

Here, I would like highlight the ultimate water hero: Ashley Hubbard, director of cultivation at RAIR Cannabis. For a quick tour of her water treatment and recovery room, see here. No one that I know manages water better than RAIR Cannabis and Ashley leads the team there.

To download the complete guide and get to the beef quickly, please request the complete white paper Top Quality Cultivation Facilities here.

Stay tuned for Part 3 coming next week where we’ll discuss The Right Build Out.

The 3-Legged Stool of Successful Grow Operations: Climate, Cultivation & Genetics – Part 1

By Chris Wrenn, Phil Gibson
2 Comments

Ideal cannabis profits come from high demand/high selling prices and low production costs. The spread between those two, or margin, can determine the life or death of your business. We want to share this series of articles so that your next investment can be highly successful and high margin out-of-the-box.

Regardless of the grow method (soil, coco, rockwool, hydro or aero), every plant performs best in its own ideal environmental conditions. Experienced growers gained success through hard work, and just that, experience. Many have tried more advanced grow technologies, but shied away due to early trial failures or the complexity of maintaining chemistry across a grow facility. The wonderful thing now is that precision sensors and software controls eliminate the risk to robust healthy plants and harvest success. Growers are now able to both manage production while performing research in line with their operations.

We have learned a great deal working with our grow partners over the last 6 years. Every grow facility and location are different due to local weather, business environment and scale. This series of articles and guide, authored by our expert, Christopher Wrenn, will include recommendations of the most successful approaches we have seen here in North America and all over the world.

A 4-Layer fully aeroponic flower room using movable racking systems

Building top-quality cultivation facilities is no simple task. Cultivators are also looking for new help as they shift from older soil or media approaches to more efficient grow methods. One powerful method is aeroponics, which is very good at growing any type of plant in air in a sterile environment, with labor, nutrient and water savings.

Where possible, we will share key vendors that support healthy grow operations and (since it is World Series Time), customer examples that are knocking it out of the park. In today’s competitive business environment, it is critical to do what we can to increase profitability and survival in the face of steep headwinds. We want you to crush it and be “the last man standing.”

So, let’s get to it.

Climate: Environmental Control

We begin with a critical leg in your environment. The process of photosynthesis is more than just light, plant and moisture. We want to do more than just grow plants. We want to grow highly profitable plants. That means we have to accelerate photosynthesis so we are growing faster, bigger and more potent than our competitors.

The Vapor Pressure Deficit (VPD) is the amount of “drying power” available in the air surrounding your plants. This is a useful way to understand the amount of moisture your atmosphere can remove from your plants as they digest carbon dioxide and aspirate water and oxygen into the air around your plants. A higher vapor deficit is a good thing for growth; It is also a measurement of how much nutrient you can uptake into the plant roots and convert into size and potency in the canopy. We recommend that you have resources in your grow rooms to maintain your environment to within 5% of both your humidity and temperature targets for ideal results.

Onyx Agronomics is a Tier 3 indoor cultivator in the State of Washington. This is the canopy in one of their 8 flower rooms.

In our Top Quality Cultivation Facility white paper, we review environmental settings for temperature and humidity for mother, clone/veg and flower rooms for day and night light cycles from early cuttings through to end of harvest flush. Day temperatures can be up to 20% higher than night temperatures for example.

Cooling

Managing temperature may seem straight-forward but the heat generated by LED lights, HPS lights or the sun will vary across rooms, time exposure and with the distance of the light source from the plants. Measurement sensors should be distributed across rooms to monitor and trigger temperature resources.

Humidification/Dehumidification

This is a topic that can be underappreciated by cultivators. It is important to slowly transition humidity as you move plants from cuttings to clones, to veg and to flower. Beginning in a very humid stage to motivate root start, humidity will be stepped down from an opening near 90% down to an arid 50% in your end of flush flower rooms. We detail the transitions in 5% increments in the white paper.

The 4-Layer aeroponic flower room with movable racking systems from the side with a tall human for scale. One can do a lot with 30′ ceilings.

Relative Humidity (RH) and the related VPD are the key metrics to accelerating growth throughout the stages. Not sizing dehumidifiers correctly is one of the most common mistakes our grow partners learn about as they move to full production. In the first phase of turning cuttings from healthy mothers into rooted clones, hitting your target VPD to motivate root growth is the number one success factor. This will require the addition of humidity into your clone room. It is also typical to require raise the humidity of your flower rooms when you transition clone/veg plants from the high humidity clone/veg room into an initially dry flower room, otherwise the plants may go into shock as a result of the dramatic change.

As flowering begins, if humidity remains high, and the VPD is below target, the plants will not be moving nutrients and transpiring moisture. We have seen lowering the humidity from 70% in a flower room down to 50%, results in a yield increase from 50 grams to 90 grams of dry trim bud per plant, so a smooth transition can both accelerate growth and have a big impact on your margins and profitability.

Plants in aeroponics can truly have explosive growth. This means that they will also transpire moisture at an accelerated rate. Fast automated growth in aeroponics means increased humidity output. Sizing these critical systems for humidification/dehumidification are a critical part of the design process.

Airflow

Fans combined with your cooling/heating/humidity/dehu systems need to mix the air in a room to break the boundary layer at the leaf surface for transpiration. As we covered, VPD is critical to growth success. A dry surface motivates the plants to transpire moisture. We recommend flow rates across the canopy in a 0.5-1.5 meter/second rate to align to your genetics and where you are in the flowering process.

A raw facility before it gets outfitted.

Airflow and flowering means rich beautiful aromas are generated. Every facility has to consider odor control. If you are in a populated area, you will have ordinances and neighbors to satisfy. The best way to do this is to minimize the amount of air that exits a facility. This is also the cheapest approach.

Sterile HEPA filters and scrubbing systems clean air of pathogens and odor but they also need to circulate and “condition” air to the correct temperature and humidity levels before it can be recirculated into a room. Oftentimes, this is a good place to also recapture humidity and reinject it into your pure water cleaning systems.

Key vendors to talk to about sizing air treatment systems are SURNA, Quest, Desert Aire and AGS. Each of these vendors have specialties and tend to be superior partners in different regions of the world. We would be happy to introduce you to excellent support resources for air management systems.

To download the complete guide and get to the beef quickly, please request the complete white paper Top Quality Cultivation Facilities here.

Click here to see Part 2 where we discuss water quality and management.

Your Cultivation Plan is the Most Important Factor to Increase Your Yield

By David Perkins
No Comments

Having a well-built grow room with adequate lighting, the ability to properly control the environment, proper nutrient feedings, a good pest management plan, well trained employees and an experienced cultivation manager are very important to the overall output of cannabis plants. However, even if you have all those measures in place, there’s no guarantee of success. One factor that is often overlooked is how many harvests you can get per year, as clearly the more harvests you can get in a given time period, the more likely your chances of success are in this competitive industry. This is why having a good cultivation plan in place, with proper foresight and planning, is so essential to success.

Increasing yield or production output in a cannabis cultivation facility can often be as simple as having the right cultivation plan in place to ensure that you are harvesting the maximum number of times per year. All it requires is a well thought out plan, and best of all, that does not cost any money if you have someone with enough cultivation experience assisting you and will earn back more than the cost of paying a consultant to get such a plan in place.

In this article I will explain why changing nutrients, grow media or even a cultivation manager may not necessarily increase yield, quality or your chance of success. What you should be focusing on is your cultivation plan and the scheduling of your cultivation cycles.

  1. Why changing nutrient companies may not necessarily increase your yield
Nutrient dosers are used to inject fertilizer directly into irrigation lines

For the most part, nutrient companies use the same ingredients in their product lines and often buy them from the same source, but they combine them in different forms and ratios to create their “unique” product. You can go to a grow store, pick five different nutrient products, read the labels and compare the different nutrients in each one. You will find for the most part that they are very similar. Generally speaking, you could pick any one of those five nutrient companies and have great results. Mixing nutrients into a nutrient tank needs to be done precisely and if your employees are not doing it properly this can lead to plant health issues. In larger cultivation facilities, often nutrient dosers are used to inject fertilizer into the irrigation lines without having to mix nutrients. However, if the dosers are not set to the proper ratios, this can also lead to plant health issues.

There are a few companies that I really like that have a different approach to plant nutrition, which saves time and can prevent human error associated with mixing and applying liquid nutrients. Soilscape solutions, Organics Alive and Beanstock Agriculture all have nutrient lines that are intended to be used with soil or soilless media that can be amended into the soil which provide a slow steady release of nutrients that the plants can uptake as needed. This avoids the risk of human error in repeatedly applying liquid nutrients to the plants.

  1. Why changing grow medium and nutrients will not necessarily improve your yield but may increase yourquality

Whether it is rock wool, coco fiber, a soilless mix or living soil, everything has a limit. Giving your plants the proper amount of water and the frequency at which you water, along with having sufficient room for the roots to grow are key factors to ensuring plant health. If your plants aren’t getting watered properly, no matter what media you are growing in, you will be having problems. Changing things like grow media won’t result in instant success, as there will always be a learning curve when making changes to your cultivation. If you cannot adapt quickly enough, you can quickly create major problems.

plebanisoil
Changing things like grow media won’t result in instant success, as there will always be a learning curve when making changes to your cultivation.

You would be better off to master the grow media you are currently working; you will have more chance of success making slight alterations to your current media than you will if you switch your grow media altogether. There are so many different nutrient lines, soil companies, coco coir companies and the truth is any of them can lead to success.

Changing grow media and nutrients do play a large role in quality though. With cannabis being legalized in many states, the overall quality of cultivation inputs have increased, especially nutrients. However, in general, with some exceptions, the quality of cannabis has not necessarily increased along with the increase in quality of nutrients. One exception: I would argue that switching from salt nutrients and rock wool, to organic living soil will result in an improvement to the flavor, quality and terpenes of the cannabis.

A lot of people use rock wool with salts because it’s easier to scale up than if you are growing in soil, but some quality is also sacrificed. Soil is heavy and messy and most people throw their soil away which takes a lot of money and labor to do. Reusing your soil is one of the best ways to save time, money and increase quality. I had a friend that grew the same variety, same lights, same ventilation but grew hydroponically with salt-based nutrients and he would always say the cannabis I grew, organically, tasted better. The same was true when we grew the same variety outdoors. He used salt-based fertilizer, I used amended soil with water. There wasn’t really a comparison in flavor and the yield was not compromised either! This was his opinion not mine.

I think the vast majority of consumers have not seen the type of quality that someone in Northern California who has been smoking and growing for 20 plus years has seen. Quality is relative to what you have been able to acquire. Most people especially nowadays will never see the quality that used to be common when we didn’t treat the sacred herb like a commodity. When you do it for the love of the plant it shows. Remember, quality is relative to your experience and if salty weed is all you know, you are probably missing out.

  1. Why changing your Cultivation manager may not necessarily increase your yield

Every cultivation facility should have an experienced cultivation manager who is knowledgeable in the areas of nutrient requirements, pest management, environmental requirements, managing employees and overall facilities operations. If a grow room cannot sustain the proper environmental set points, blaming the problems and issues that arise on the cultivation manager is not fair. It is a common problem in the cannabis industry – the owners of a company are not seeing the results that they want and think that by replacing the cultivation manager it will solve all their problems. In reality, often the problem results from upper management or owners of the company not providing the cultivation manager the tools necessary to perform their job at the highest level. Another common problem is when owners fire the cultivation manager and replace them with lower-level employees to manage the facility. The problem with this is those employees do not have enough experience nor the attention to detail to successfully run a cultivation facility. The result is that yield and quality suffer tremendously.

  1. You should be harvesting every 60-70 days
If you are cultivating strains that finish flowering in 60 to 70 days you should be getting five harvests per year.

The reality is there is no one specific thing you can try or buy that will result in success. It is everything combined, the HVAC system, lights, genetics being grown, water quality, air quality, root zone temperature, ability to control environment, having a clean facility, disease free plants, knowledgeable cultivation manager etc. that are required to operate a successful cultivation.

But all of that is less important to yield than a good cultivation plan. Cultivation methods directly tie into the overall production of a facility. But, regardless of whether you’re growing in soil, hydroponics, using LED or HPS, have low or high plant counts, if you don’t have the ability to harvest a grow room, clean and replant within a very short amount of time (ideally one or two days) then you’re going to be losing out on profit.

If you’re cultivating strains that finish flowering in under 60 days you should be getting six harvests per year. If you are cultivating strains that finish flowering in 60 to 70 days you should be getting five harvests per year. To do this, you will need to have the appropriate amount of plants that are ready to be flowered to refill your grow room or greenhouse ready to flower. With a little bit of planning and foresight you will be able to do this, and you will be on your way to producing your highest yield potential.

If you are struggling to have enough plants that are ready to flower once you are done harvesting and cleaning your grow room, having trouble planning your cultivation schedule to maximize production, or struggling to maintain a mother and clone room to supply your own plants or planning for the appropriate amount of labor, contact Floresco Consulting and talk with one of our cultivation advisors to get you back on track. We can guide you to ensure you are harvesting, cleaning and replanting every 60 days. Contact us today to get your facility producing at its maximum potential.

The Rise of a New Market… And a New Consumer

By Christiane Campbell
No Comments

The adult beverage industry, like any other category of consumer branded products, is driven by trends. If you’re old enough to remember Bartles & Jaymes wine coolers, you probably also remember Zima and Smirnoff Ice, and more recently “healthy” options like Skinny Girl and Michelob Ultra. The sensation that was craft beer saw many brands being acquired by Big Alcohol so that while the brands remain, ownership and production have changed significantly. Gin, tequila and vodka have had their moments in the sun and the current market is undeniably saturated with what is probably the largest current trend – hard seltzers. However, with the seltzer craze waning, many are wondering what’s next. And with the growing sober/California sober trends, some are betting it is cannabis-infused beverages.

Cannabis-infused beverages offer both an alternative method of consumption of cannabis and are also an attractive alternative to alcohol. Infused beverages are more appealing to the new demographic of casually curious cannabis consumers. i.e., consumers that may not be interested in smoking a joint or vaping, but are comfortable micro-dosing from a can or bottle, as they would a seltzer or beer. The same type of consumer may be moving away from alcohol consumption to eliminate hangovers or other negative health effects.

The emerging market and curious consumer group present an enormous opportunity right now for cannabis-infused beverage brands. Of course, with opportunity and growth come challenges. And while cannabis-infused beverages face a host of legal and regulatory challenges relative to sourcing, manufacturing, packaging, labeling, shipping, marketing, distribution and sale, one of the most critically important business assets to address at inception is the brand.

Lines are Blurring, Gaps are Being Bridged

The U.S. cannabis market is currently a geographic hamburger. Hear me out: Geographically, you have a relatively mature market out west and a relatively new and growing market along the east coast. These are the buns. You have a mixed bag in between, with some states coming online and allowing medical or adult use cannabis use and others that have not yet embraced any form of legalization. The landscape has lent itself to the development of regional brands, such that brands that are so similar they might otherwise confuse consumers, have been able to co-exist in different regions without issue, or because there is little to no trade channel or market overlap. Similarly, adult beverages and cannabis have historically been separate verticals, with an arguably low likelihood that a consumer would assume a particular cannabis product and adult beverage product emanate from the same source.

A drink additive, made by Splash Nano, that uses nano emulsion technology

However, lines are blurring and gaps are being bridged. Walls are breaking down. The increasing number of states coming online with legalized cannabis, and the proliferation of multi-state operators (MSOs), means that cannabis brands can grow to be more than siloed regional brands. This will inevitably lead to brands that previously co-existed bumping into one another and there’s bound to be some pushing and shoving. The advent of infused beverages likewise bridges the gap between cannabis products and alcoholic beverages. While the respective industries were not historically per se related, competing, or overlapping, now you’ve got infused beverages that bridge the gap between the two, and traditional alcohol brands (e.g., Boston Beer Company, Molson Coors, Lagunitas, Pabst.) entering the market (albeit under different brands). This makes a strong argument that cannabis and alcohol (or, more generally, adult beverages) are within each other’s logical zones of expansion, for purposes of a likelihood of confusion analysis.

The growing pains infused beverage brands will experience are analogous to those craft beers saw in the 2000 – 2010s. Many craft brewers had catchy, cheeky names and brands that contributed to their ability to engage consumers and develop a following, but failure to clear and protect the brands prior to launch detracted from the brands’ market values. Localized use prior to expansion also led to many brands bumping into one another and stepping on each other’s trademark toes. This was significant as the brands sought investment dollars or an exit strategy, making clear that the brand itself contributed heavily to valuation.

Mitigating Risks and Overcoming Challenges: Search and Protect 

The risks and challenges can be significantly mitigated and/or overcome with proper preliminary clearance searching and assessments, and by seeking and obtaining state or federal protection for the brand or brands, to the extent possible.

Quatreau CBD infused sparkling water

Of course, clearance searches and assessments come with their own challenges, as does federal protection. With respect to clearance searches, these typically look at U.S. federal and state trademark databases. These resources are not sufficient for purposes of clearing a proposed cannabis brand. Many brands are not recorded at the federal or state level and indeed may not even show up in a basic search engine. An appropriate search looks at social media resources like Instagram, Twitter, Facebook and known cannabis resources like Leafly and Weedmaps. Additionally, the scope of the search should exceed cannabis products and services and at least look at alcohol and merchandise. Adoption and use of a brand for a cannabis-infused beverage is high risk if that brand is similar to a prior existing alcohol brand. A current example is Cointreau’s taking aim at Canopy’s adoption and use of QUATREAU for an infused beverage.

A U.S. federal trademark registration presents its own unique challenges, but is incredibly valuable and beneficial to a brand since it provides the owner with a nationwide presumption of ownership and validity in a trademark, and can also secure priority for the owner with a constructive first use in commerce date that is years before actual use of a mark begins. The U.S. Trademark Office categorically denies protection of brands that violate its “lawful use” rule, and will treat as per se unlawful any applied for mark that covers marijuana, or that covers foods, beverages or pharmaceuticals that contain CBD. With respect to brands that cover products containing THC, since it is federally scheduled, use of the brand would violate the Controlled Substances Act (CSA). With respect to brands that cover CBD or products containing CBD, these may be lawful pursuant to the Farm Bill and the U.S. Trademark Office’s subsequent allowance of marks that claim CBD “solely derived from hemp with a delta-9 tetrahydrocannabinol (THC) concentration of not more than 0.3 percent on a dry weight basis,” however under the Food Drug Cosmetics Act (FDCA) it is currently federally unlawful to introduce CBD – even if it fits the definition above – into foods or beverages.

Even if cannabis is not specifically claimed in a trademark application, cannabis brands have a natural gravitation toward names and logos that can do some of their marketing for them, and announce to the world they cover cannabis. This increases the chances that a trademark application for the brand will get push-back from the U.S. Trademark Office, and if not at the initial review stage, then at the point in time when the brand must submit to the U.S. Trademark Office a sample of (lawful) use of the applied-for mark. While this all sounds like bad news for cannabis-infused beverages, all is not lost.

There are typically ancillary and federally lawful products and services cannabis companies offer under their brands that can be covered in a U.S. federal trademark application, and arguments to be made that registered protection of a brand for the ancillary items should be sufficient to enforce against third parties using the same or confusingly similar brands in their space. Some cannabis brands’ lawful ancillary products are actually product lines (e.g., beverages) offered under the same brand that contain no cannabis. Others may be more causally related, like online forums and blogs. The former is closer to the actual product, and the latter would be more beneficial to a brand that is inherently stronger and more distinctive. One note of caution: A trademark application and eventual registration that expressly disclaim cannabis (THC or CBD) may be difficult to enforce against a third party using the same or a similar mark on and in connection with cannabis. So, while there is a natural inclination to follow a U.S. Trademark Office request to disclaim coverage of cannabis, there may be enforcement consequences down the road.

The cannabis-infused beverage market is poised for explosive growth. The brands that survive – and succeed – will be those that position themselves for growth by clearing and buttoning up their brands as early as possible. The market leaders will be those that select strong and distinctive brands, with geographic and market space around them for growth and expansion; and those that protect and enforce their brands, to the extent possible, at the federal and/or state levels.